Use AI to Bulk Categorize Products in Sheets and Excel
You can use GPT for Sheets or Excel's Classify / Categorize bulk tool or GPT_CLASSIFY function to automate the categorization of new products for your product lifecycle management (PLM). This can considerably speed up the process and reduce manual effort, allowing your merchandisers to focus on product planning and replenishment instead of manual data entry.
This guide will walk you through classifying apparel products for lifecycle inventory management using GPT for Sheets and GPT for Excel.
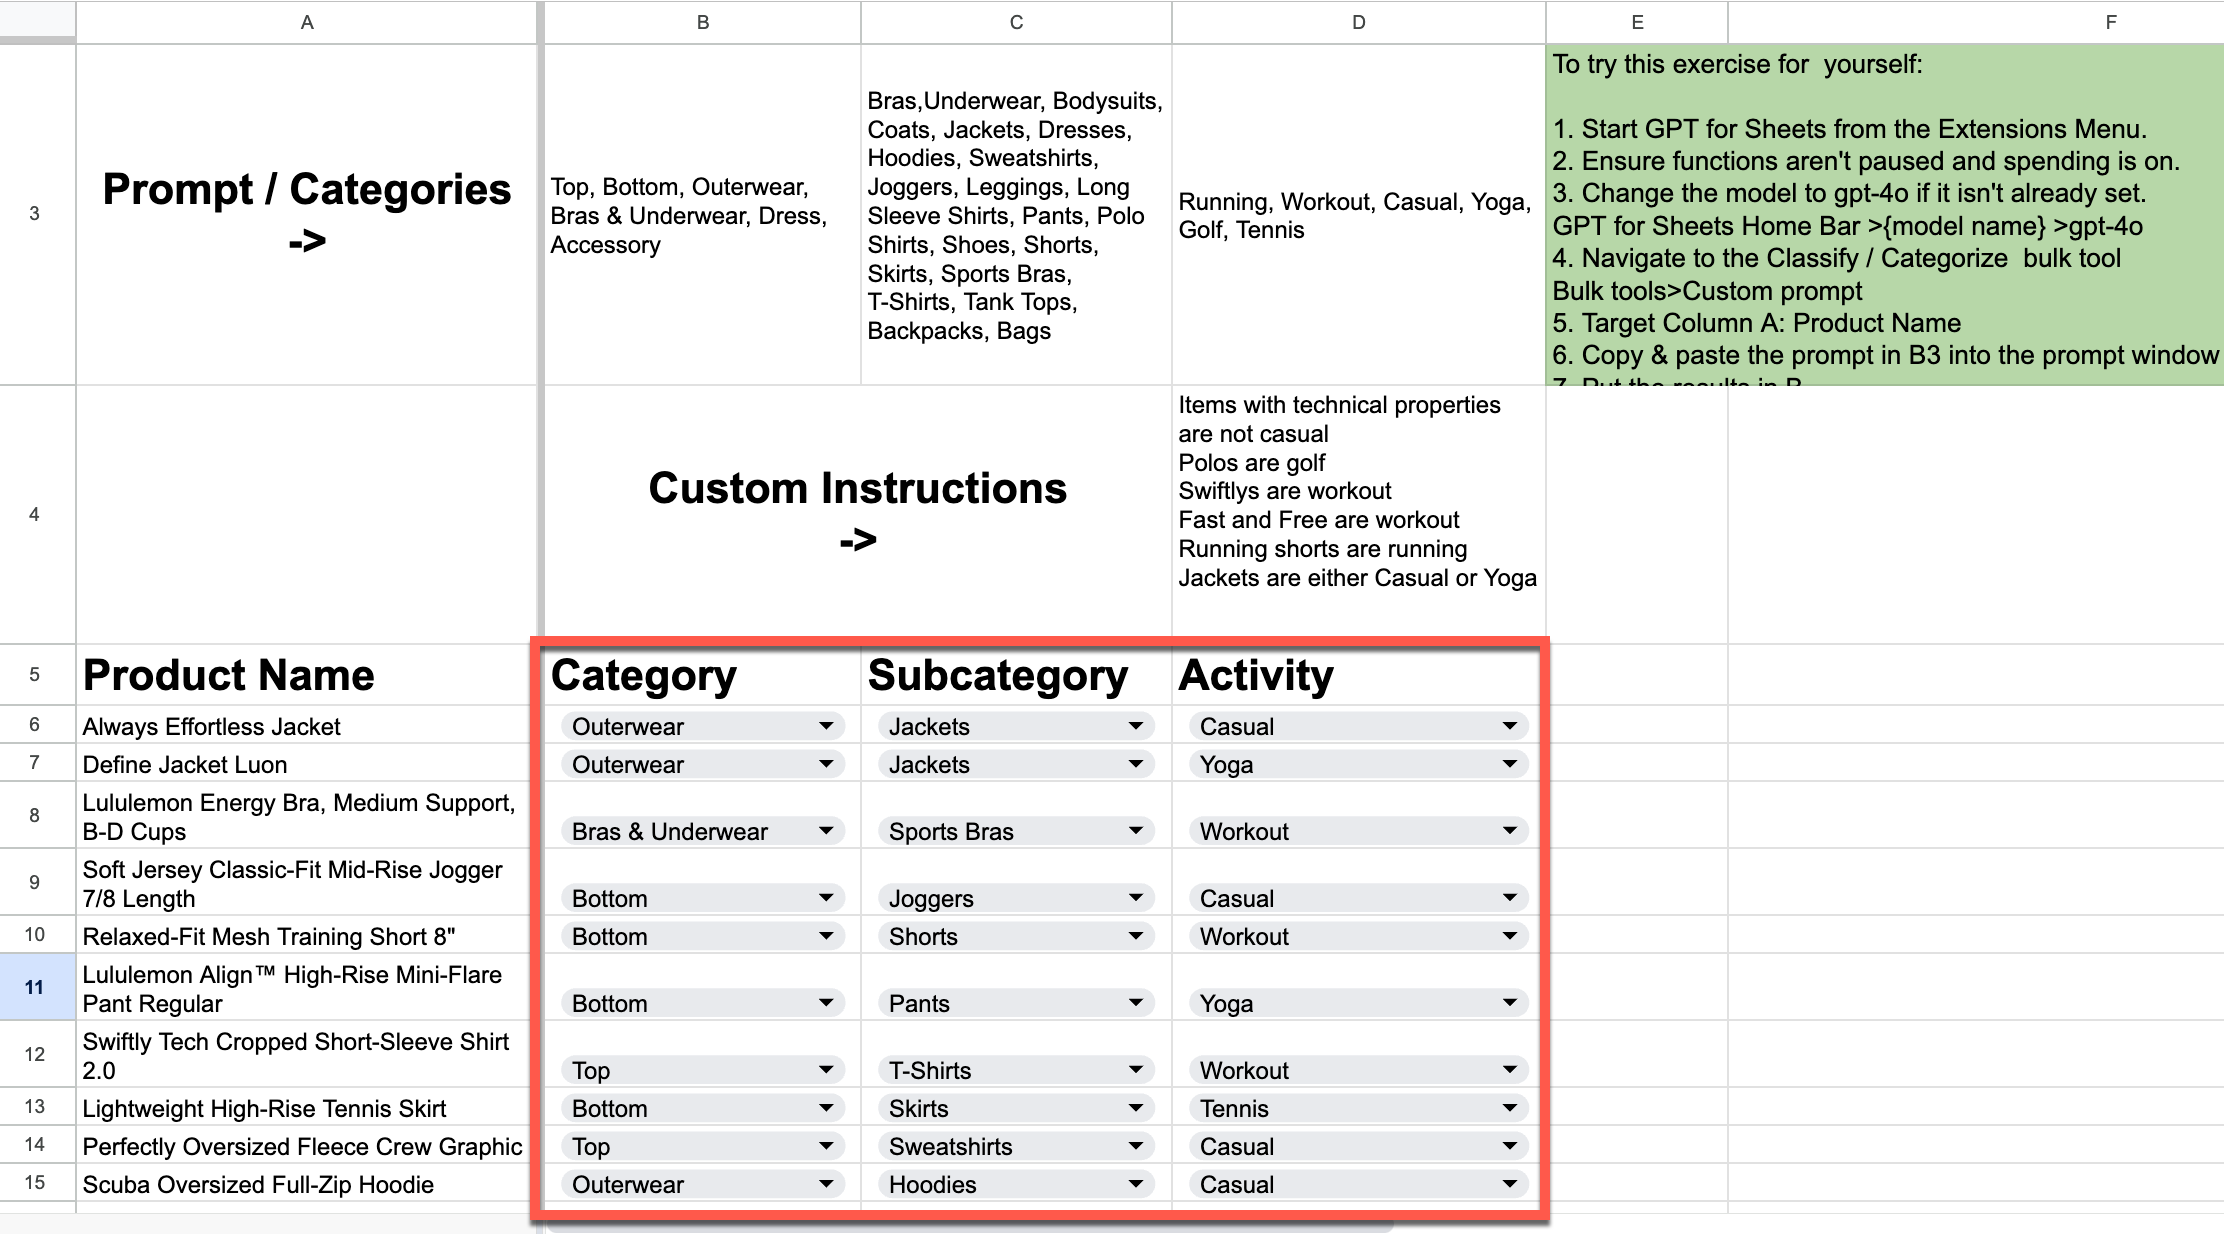
By the end of this guide, you will know:
- The benefits of using GPT for Sheets and Excel to automate parts of your product lifecycle management
- How to automatically process apparel products based on your product data using GPT for Sheets or Excel’s Classify / Categorize bulk tool
- Some additional strategies for improving classification results.
Why use GPT for Sheets or Excel to automate product classification
Manual product classification for apparel lifecycle management is time-consuming and prone to human error, especially as inventory grows. By leveraging GPT for Sheets and Excel’s Classify / Categorize bulk tool, businesses can gain the following benefits:
- Time savings: Categorize products in hours instead of weeks or months
- Consistency: Ensure uniform categorization across your entire product catalog, which will lead to better product discoverability
- Scalability: Easily handle large volumes of new products as your inventory expands
- Reduced human error: Minimize mistakes that can lead to misplaced inventory or inaccurate reporting
Integrates into existing workflows:
Users can bulk categorize all their files in a spreadsheet and then upload them directly to third-party software like FlexPLM for further management.
Classifying apparel products with GPT for Work
Prerequisites
To begin this tutorial, you need to complete the following prerequisites:
- Install GPT for Sheets or GPT for Excel.
- Copy the appropriate template:
- For Google Sheets, click USE TEMPLATE: Categorizing Apparel for E-Commerce Tutorial for Sheets with gptforwork.com
- For Microsoft Excel, click File > Download the .xlsx file in your computer, and open the .xlsx file in Microsoft Excel: Categorizing Apparel for E-Commerce Tutorial for Excel with gptforwork.com
- Or you have opened a spreadsheet containing identifiable apparel product information.
Getting started in GPT for Sheets
Open GPT for Sheets using the Extensions menu at the top of your document.
Note: You can also complete this tutorial in Excel. While the Excel version has been slightly modified due to formatting limitations between Sheets and Excel, the differences are purely cosmetic and do not affect the content or functionality of the tutorial. Other differences between the tutorials are noted below.
Selecting a model
In the GPT for Sheets sidebar, check that the model is set to gpt-4o-mini. If not, open the model switcher dropdown and select gpt-4o-mini.
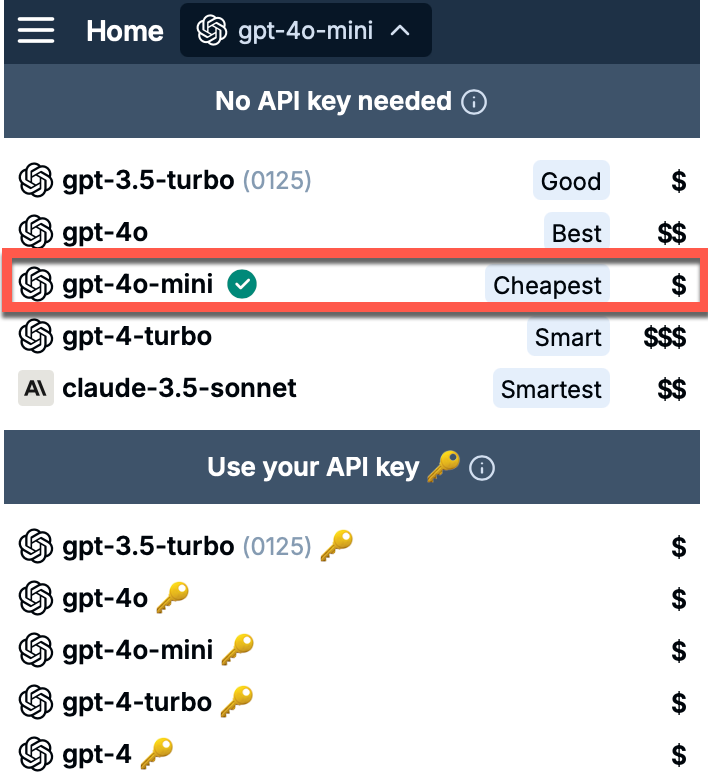
We recommend using gpt-4o-mini to complete this tutorial because of its cost savings.
Feel free to try out some different models and compare your results!
Classify apparel products by category
First, we will sort our garments by product category using the Classify / Categorize bulk tool.
Note: If you are using your own file or need help getting started, refer to our Classify / Categorize bulk tool guides for GPT for Sheets and GPT for Excel.
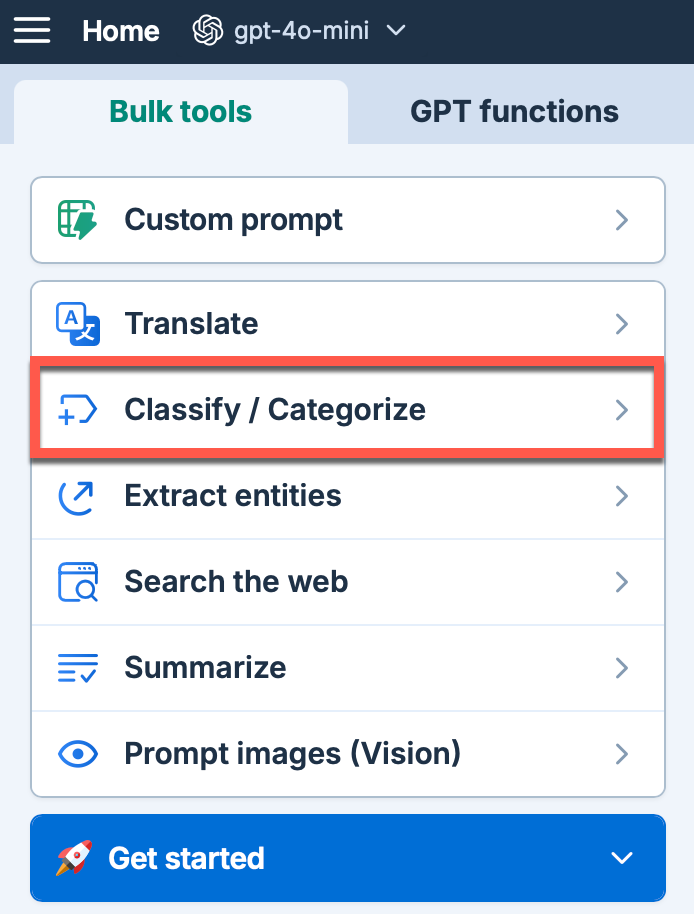
From the Bulk Tools tab, select the Classify / Categorize bulk tool to configure your classification task.
Select the column containing the product names (column A) and paste the following list of categories (also found in cell B3).
Top, Bottom, Outerwear, Bras & Underwear, Dress, Accessory
Select the column where you want the results to appear (column B).
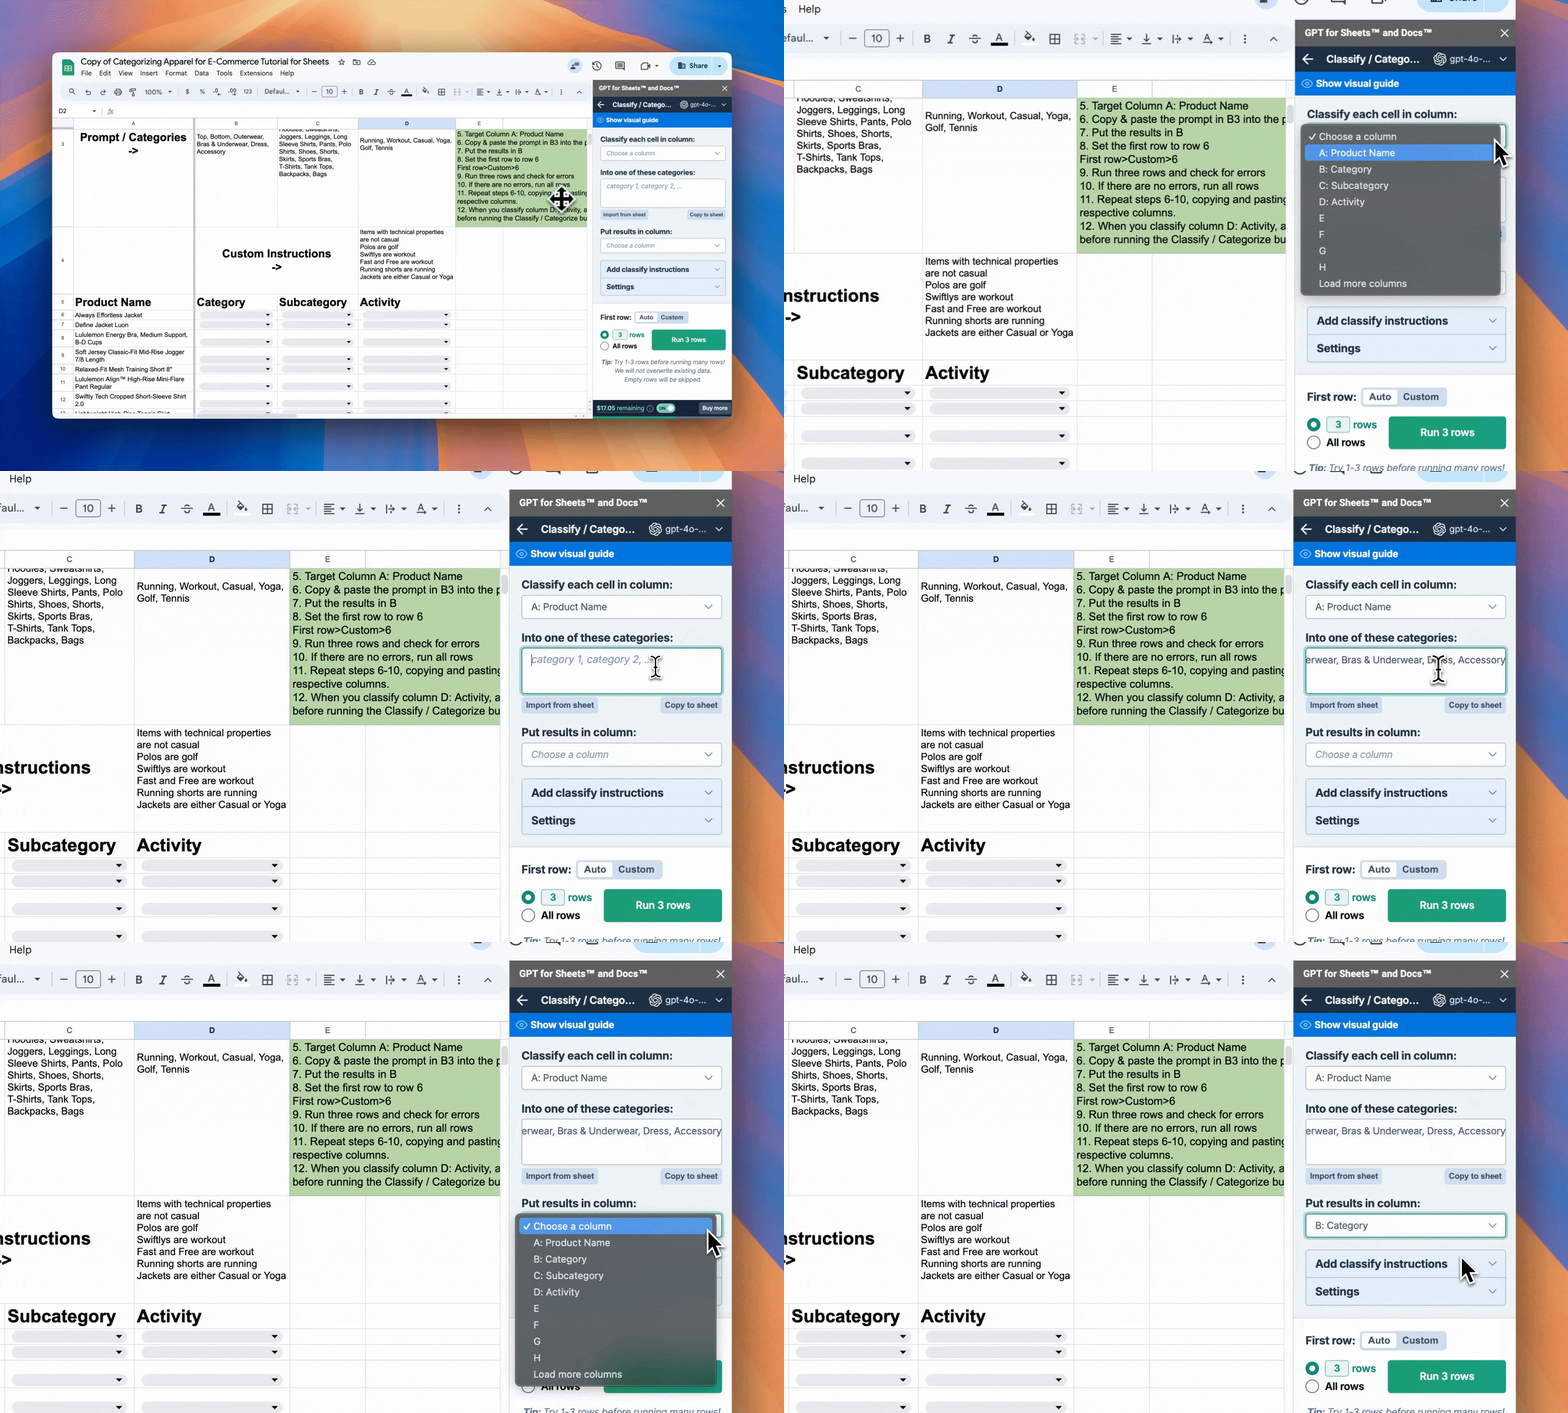
Set the first row to 6. Then, run the first three rows to test the classification and check the result (it will run the following three empty rows starting from row 6).
If satisfactory, run all rows to classify all apparel products.
Classify apparel products by subcategory
Next, we will classify our garments into subcategories.
Paste the list below (also found in cell C3) into the bulk tool.
Bras, Underwear, Bodysuits, Coats, Jackets, Dresses, Hoodies, Sweatshirts, Joggers, Leggings, Long Sleeve Shirts, Pants, Polo Shirts, Shoes, Shorts, Skirts, Sports Bras, T-Shirts, Tank Tops, Backpacks, Bags
Select the column where you want the results to appear (column C).
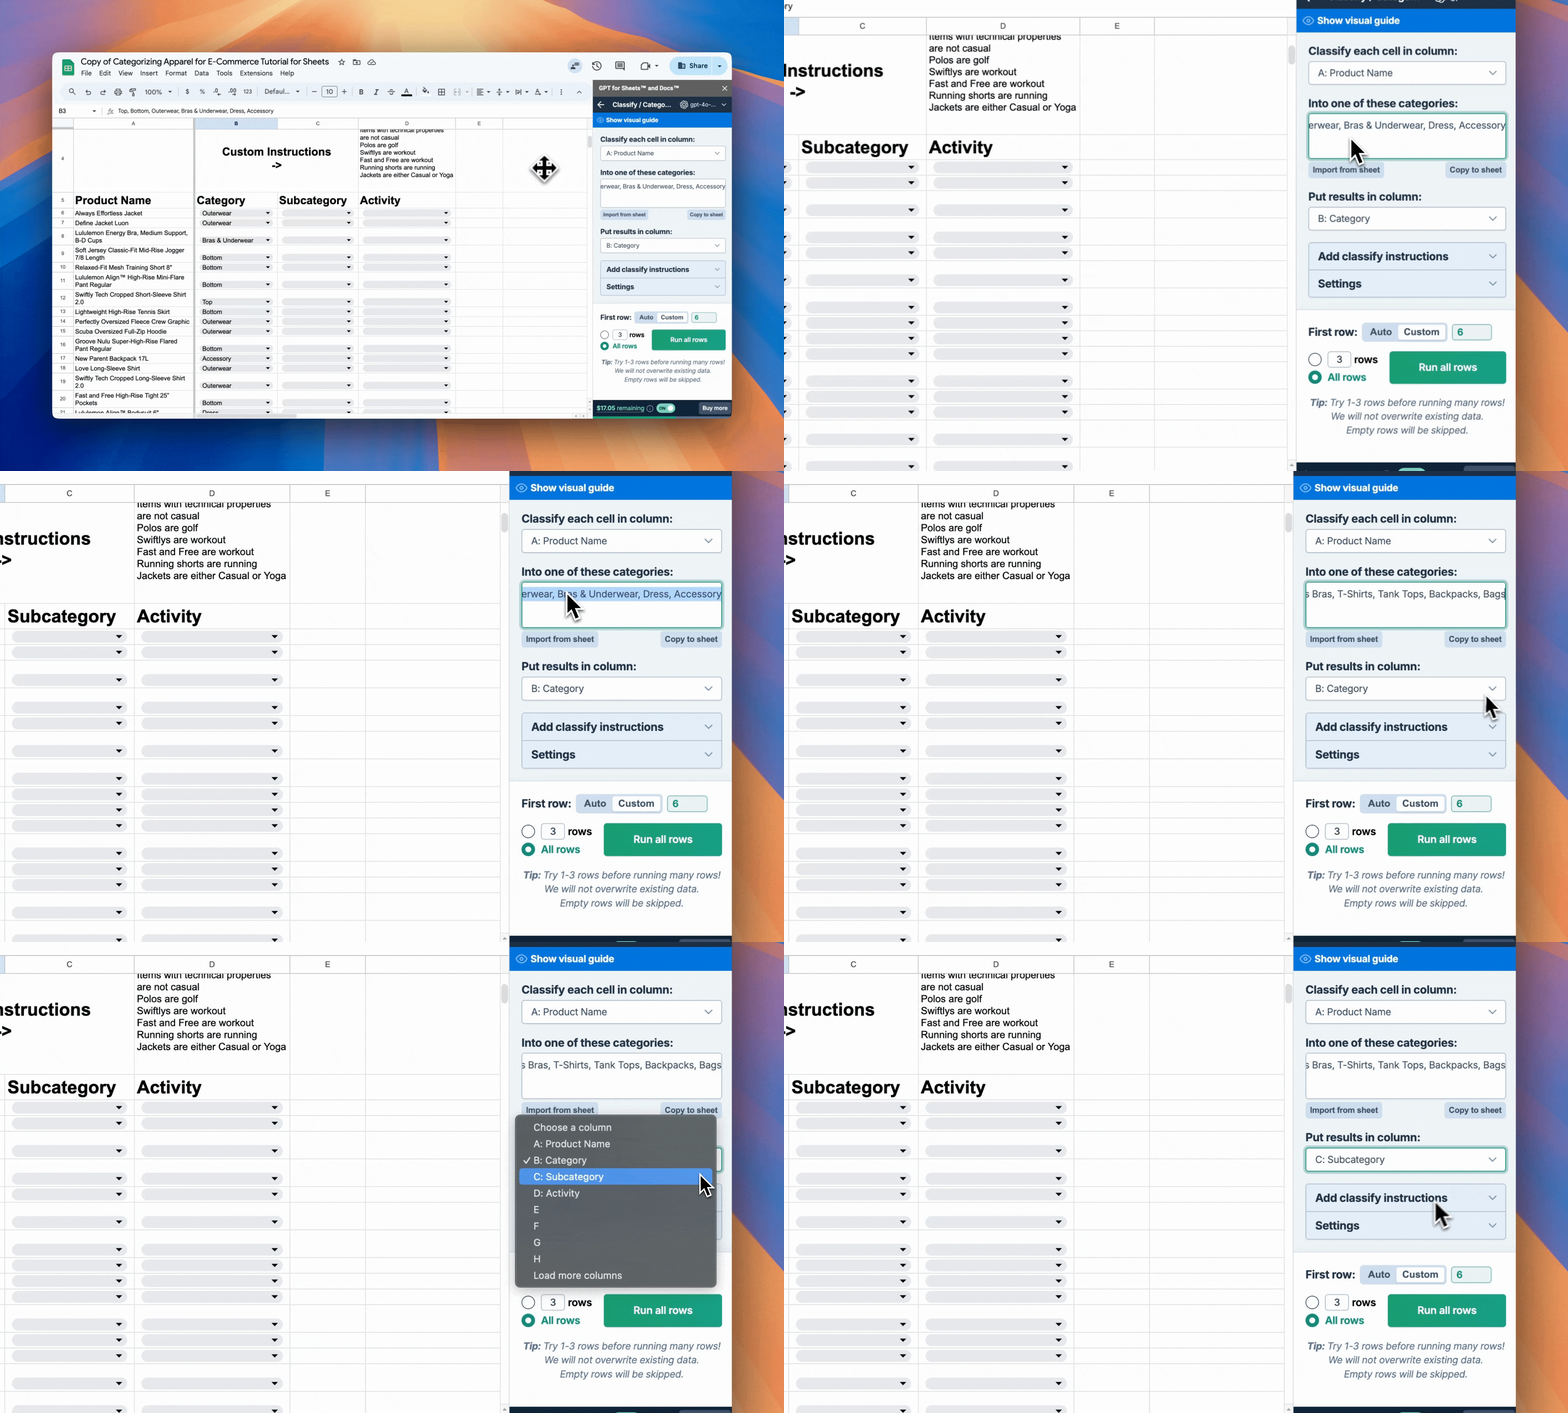
Note: You can complete the Category/Subcategory classification with fewer function calls by using compound categories and then splitting the results with =SPLIT (or =TEXTSPLIT in Excel).
For example:
Top / Hoodie, Top / Sweatshirt, Top / Long Sleeve Shirt, Top / Polo Shirt,Top / Shirt, Top / T-Shirt, Top / Tank Top, Bottom / Joggers, Bottom / Leggings, Bottom / Pant, Bottom / Short, Bottom / Skirt, Outerwear / Coat, Outerwear / Jacket, Bras & Underwear / Bra, Bras & Underwear / Underwear, Bras & Underwear / Sports Bra, Dress / Bodysuit, Dress / Dress, Accessory / Shoes, Accessory / Backpack, Accessory / Bag
With =SPLIT(A6, “/”). Where A6 contains your compound Category/Subcategory.
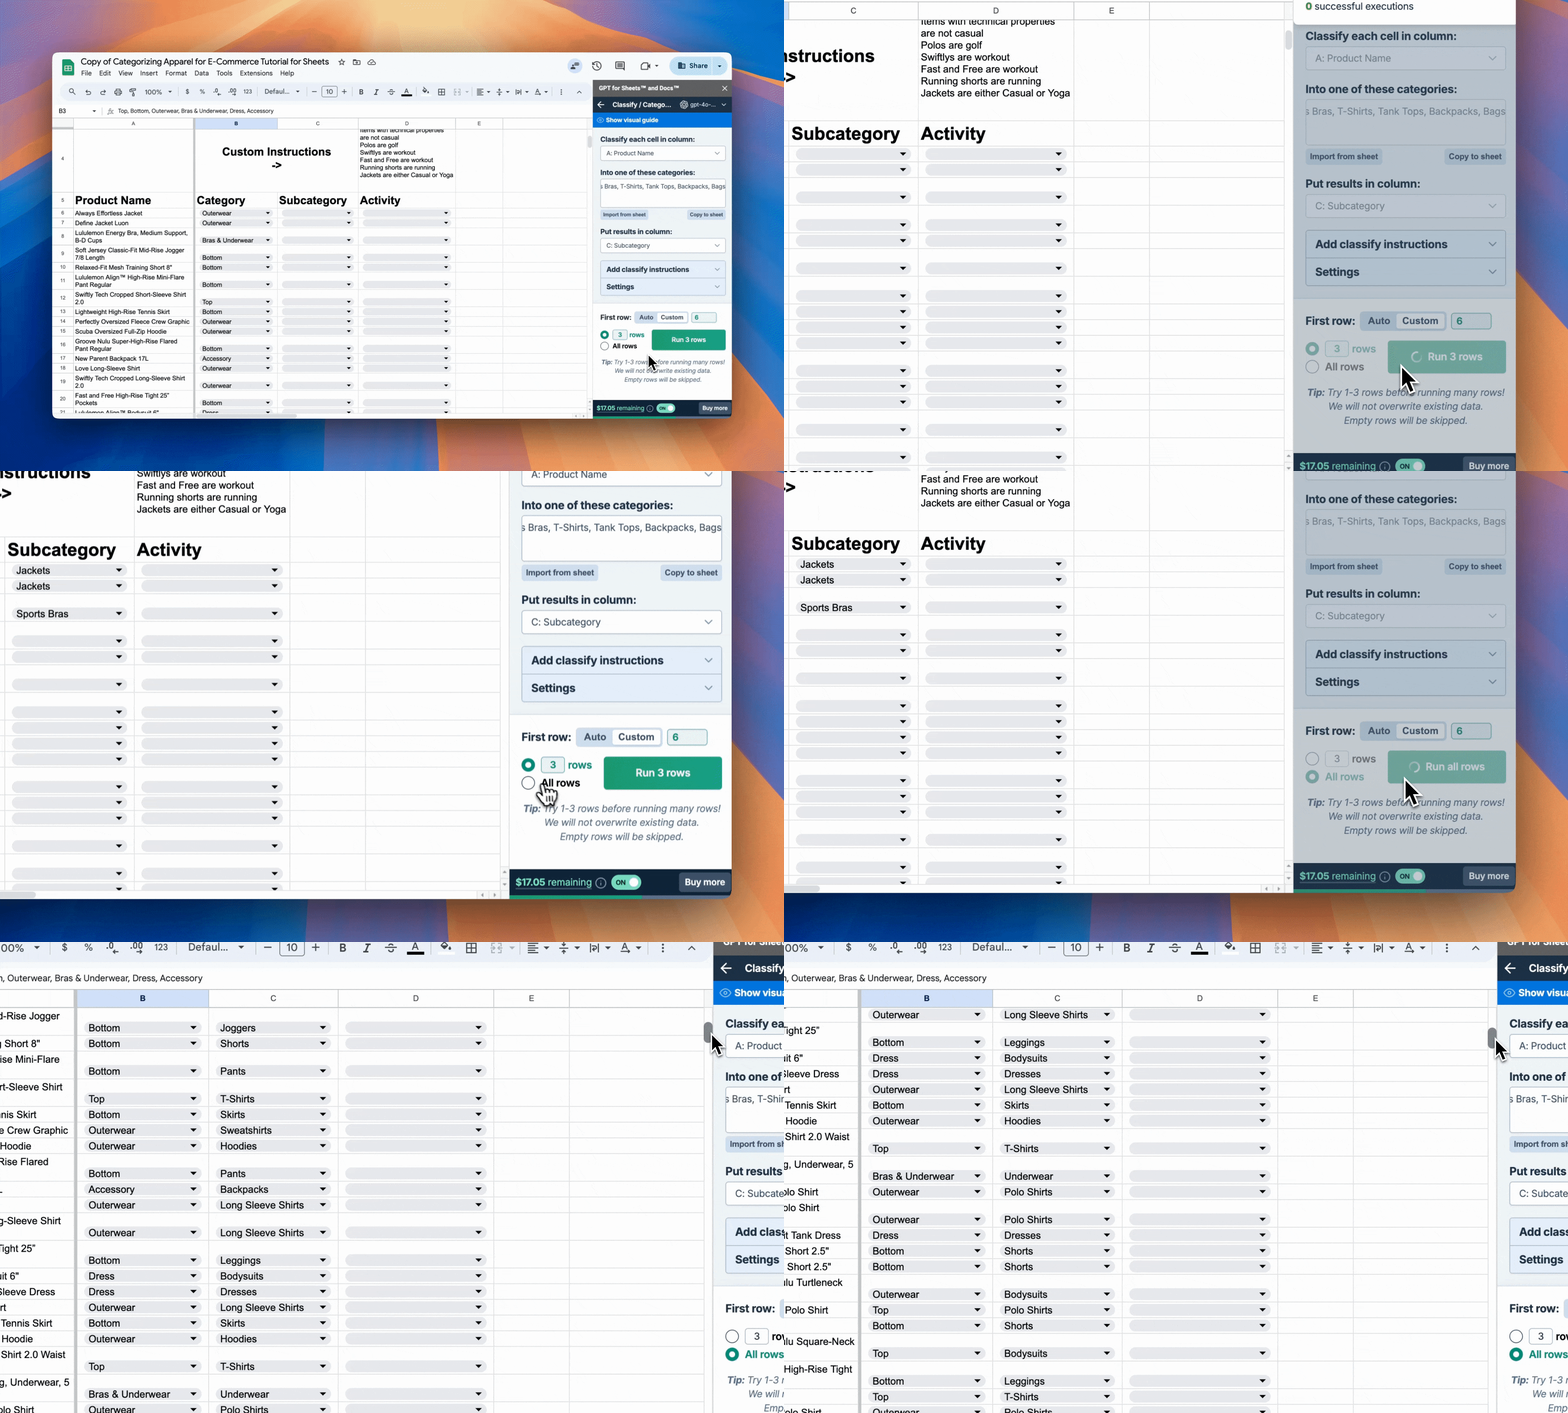
Run 3 rows to test, then run all rows if the results are satisfactory.
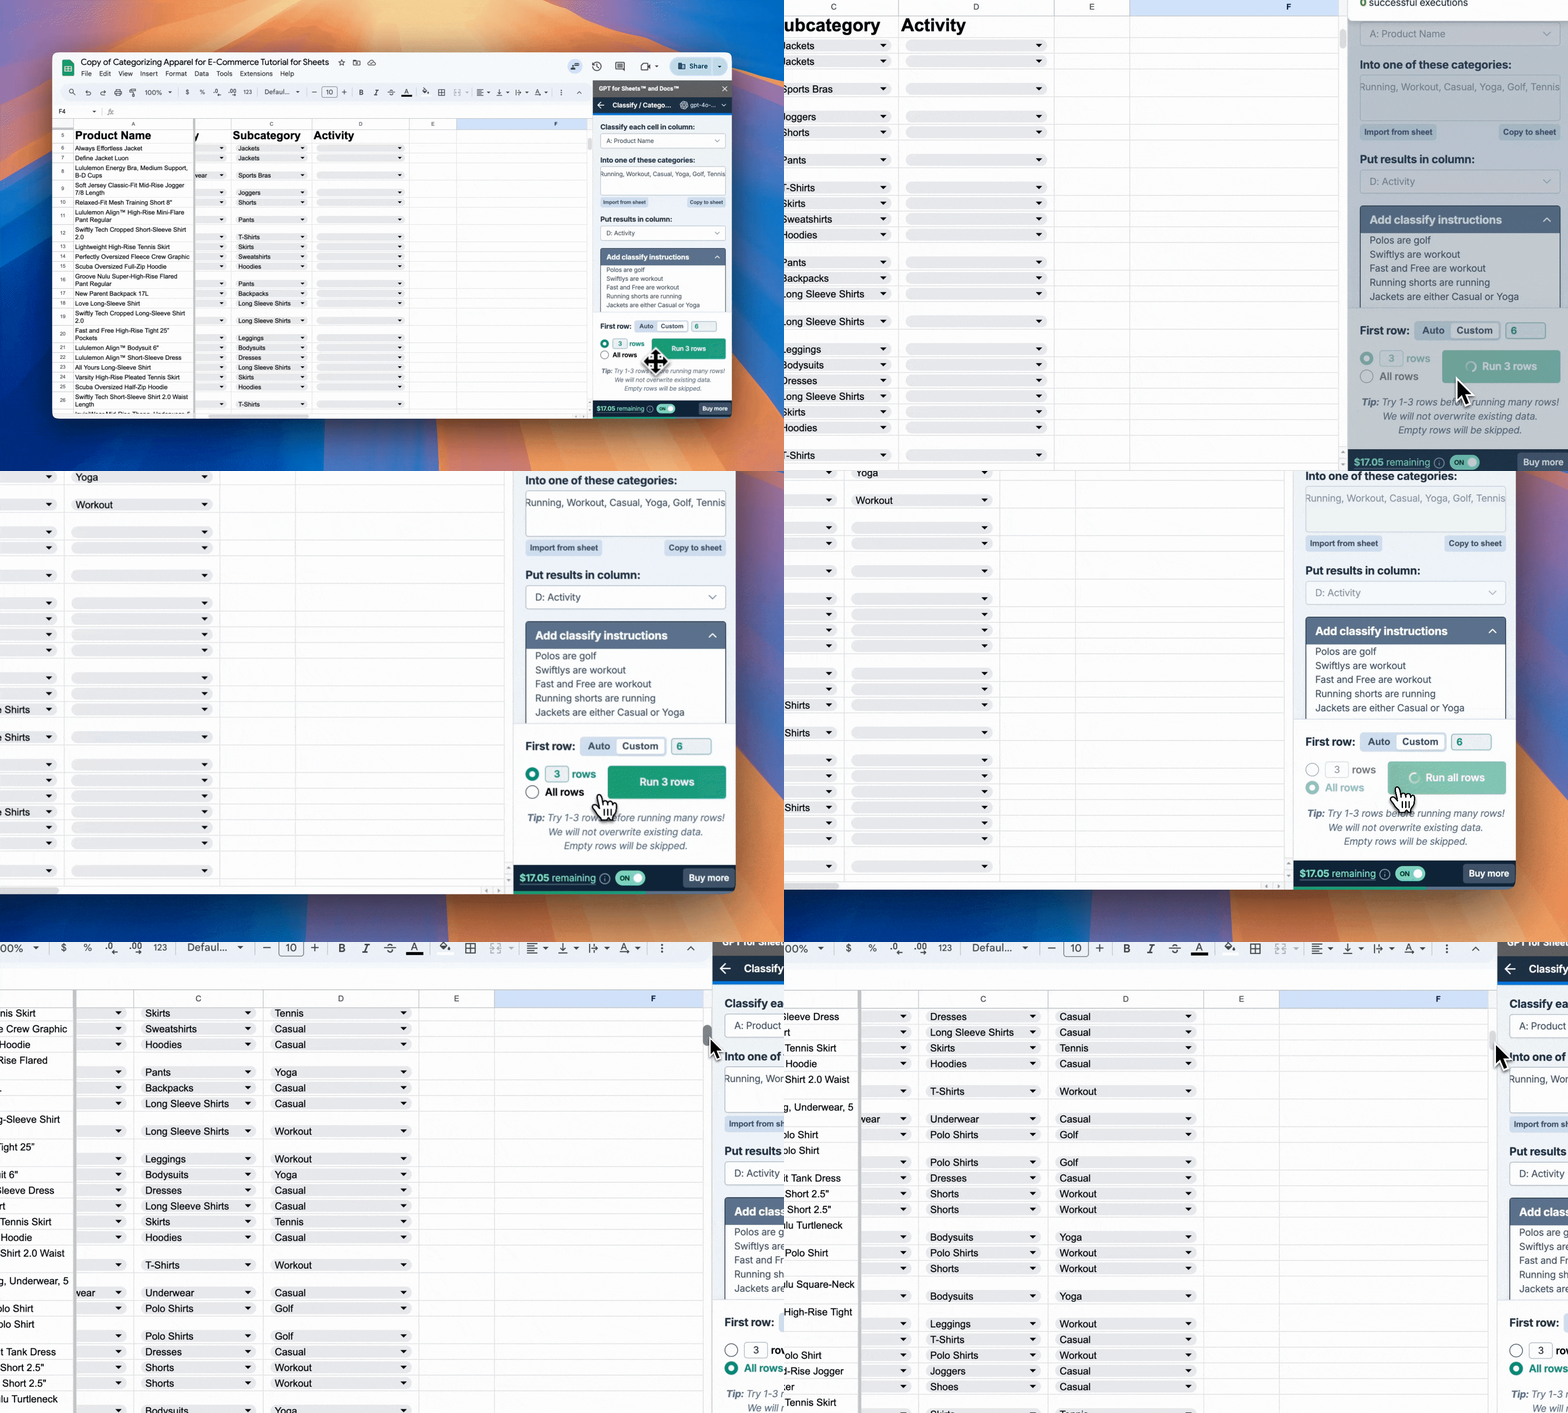
Identify apparel activity
We will sort our garments by activity once we’ve applied apparel categories and subcategories to our products.
Paste the following list of categories (also found in cell D3).
Running, Workout, Casual, Yoga, Golf, Tennis
Select the column where you want the results to appear (column D).
Add the following classification instructions (also found in cell D4).
Items with technical properties are not casual
Polos are golf
Swiftlys are workout
Fast and Free are workout
Running shorts are running
Jackets are either Casual or Yoga
Run 3 rows to test, then run all rows if the results are satisfactory.
Reviewing the results
You now have identified crucial categories required for product lifecycle management, saving you from manually adding tags.
- Category (Column B): Identifies the broad category to which an apparel item belongs.
- Subcategory (Column C): Indicates a more specific classification within the main category.
- Activity (Column D): Identifies the specific activity or use case for which the apparel item is designed.
While this is only a starting point, you can use this method to process your products automatically with whatever characteristics are appropriate for your business.
Improving Your Results (optional)
To enhance the accuracy of your apparel classifications, consider the following strategies:
Refine your category lists: Ensure categories are mutually exclusive and comprehensive. Add specific categories for unique product lines (e.g., "Athleisure" or "Swimwear")
Add a fallback category: Capture all irrelevant content into a fallback category and review it to refine your classification approach. For example, add Other to your list of categories.
Implement a hierarchical classification system: Start with broad categories, then refine into subcategories and activities. Continue to refine this hierarchy as your product assortment grows.
Use the Custom prompt bulk tool: While the Classify / Categorize bulk tool is excellent for this task, you can try using the Custom prompt tool to create a more refined prompt based on your spreadsheet’s content. You can see an example of this in our Classifying Leads tutorial
You can learn more about best practices for classification through our GPT for Sheets and GPT for Excel documentation.
Estimated Token Use
All costs have been estimated using gpt-4o-mini in Sheets. You can read more about model pricing here and view our cost estimator here.
Estimated token cost for one product classification
Category | Tokens | Cost |
|---|---|---|
Function | ~29 | ~$0.000026 |
Value | ~11.55 | ~$0.00001 |
Categories | ~28.67 | ~$0.000026 |
Output | ~2.6 | ~$0.0000023 |
Total | ~71.82 | ~$0.000064 |
Note: The estimate is based on an average of the three classifications in the Google Sheets tutorial file. Classification task costs may vary based on model, output, and total number of categories.
Estimated token cost by number of generations
Generations | Tokens | Cost |
|---|---|---|
1 | ~71.82 | ~$0.000064 |
40 | ~2,872.8 | ~$0.00256 |
100 | ~7,182 | ~$0.0064 |
1,000 | ~71,820 | ~$0.064 |
10,000 | ~718,200 | ~$0.64 |
You can also use your API keys to reduce costs. Learn more about our pricing.
Conclusion
You should now understand how the Classify / Categorize bulk tool in GPT for Excel and Sheets can help you automatically categorize new products for apparel product lifecycle management. Automating product classification quickly and in bulk can help update and manage your merchandise without the need for tedious data entry.
We would love to hear if you enjoyed this guide or have suggestions for the next one. If you want to try this exercise yourself, use either of the following tutorial files:
- Categorizing Apparel for E-Commerce Tutorial for Sheets with gptforwork.com
- Categorizing Apparel for E-Commerce Tutorial for Excel with gptforwork.com
Remember to check out the rest of our guides and documentation for GPT for Excel, GPT for Sheets, and the rest of our GPT for Work products.