All bulk tools in Excel
Bulk tools allow you to run prompts on specific spreadsheet columns at once without writing any formulas. You configure and run bulk tools from the add-in sidebar. You can also easily reuse past prompts and configurations with the History feature.
This guide shows you how to use every bulk tool available in GPT for Excel.
Run a bulk tool
-
Open a workbook.
-
On the ribbon, select Home > GPT for Excel Word.
 info
infoIf GPT for Excel Word is not visible on the ribbon, or if it's grayed out, select Home > Add-ins > My Add-ins > GPT for Excel Word. Learn more.
-
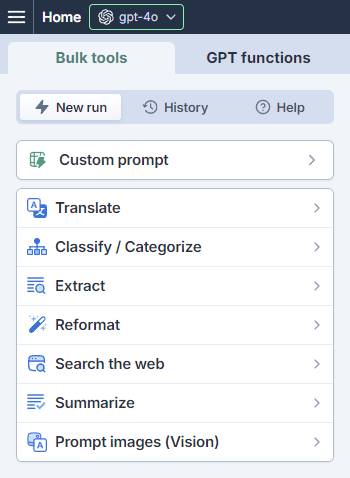
In the sidebar, select Bulk tools and select the bulk tool you want to use.
-
Set up the bulk tool run:
-
Run the bulk tool:
-
Select a specific number of rows to run or select All rows. Learn more.
-
Click Run rows.
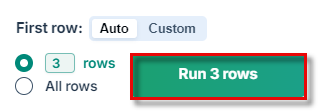
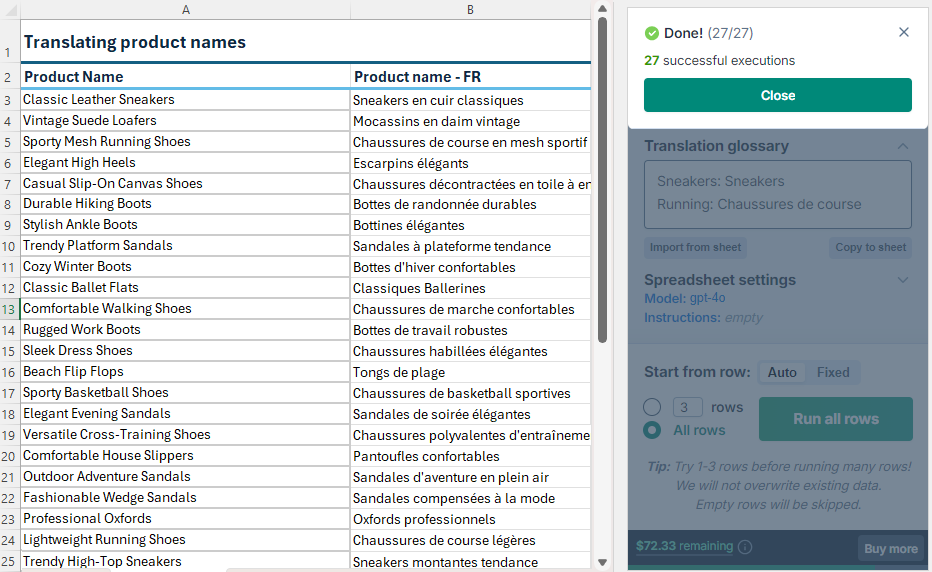
The bulk tool runs, starting from the first empty cell in the results column(s).
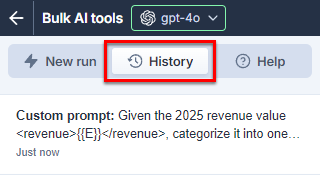
infoGPT for Excel saves the setup in its bulk tool run history. You can reuse the setup by selecting it from History.
-
-
Check the results.
-
(Optional) If needed, try improving the results.
Custom prompt
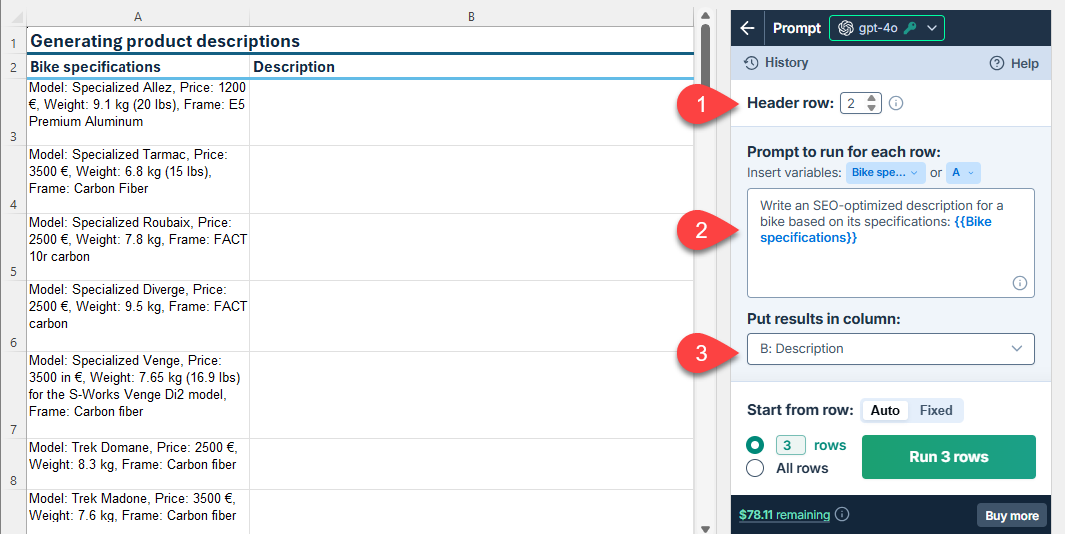
Use the Custom prompt bulk tool to perform high-volume, free-form prompting directly in Excel. For example, if you have product specifications in one column, you can generate a unique product description for each row based on the specification column value for that row.
-
Custom prompt and Prompt images (Vision) are the only bulk tools that accept images as input.
-
To use Custom prompt with image input, you must select a vision model.
Settings (Custom prompt)
| Field | Description | Example | |
|---|---|---|---|
 | Header row (optional) | If your column headers aren't in the first row, select the number of the row that contains the headers. The bulk tool will run on the rows below this one. |
|
 | Prompt to run for each row | Enter the prompt you want to run for each row. You can use column, cell, and range variables to reference content in other columns and cells in the spreadsheet. You must define at least one column variable for context. Learn more. | |
 | Put results in column | Select the column to put the results in. Cells in this column won't be overwritten with the results if they contain text. |
|
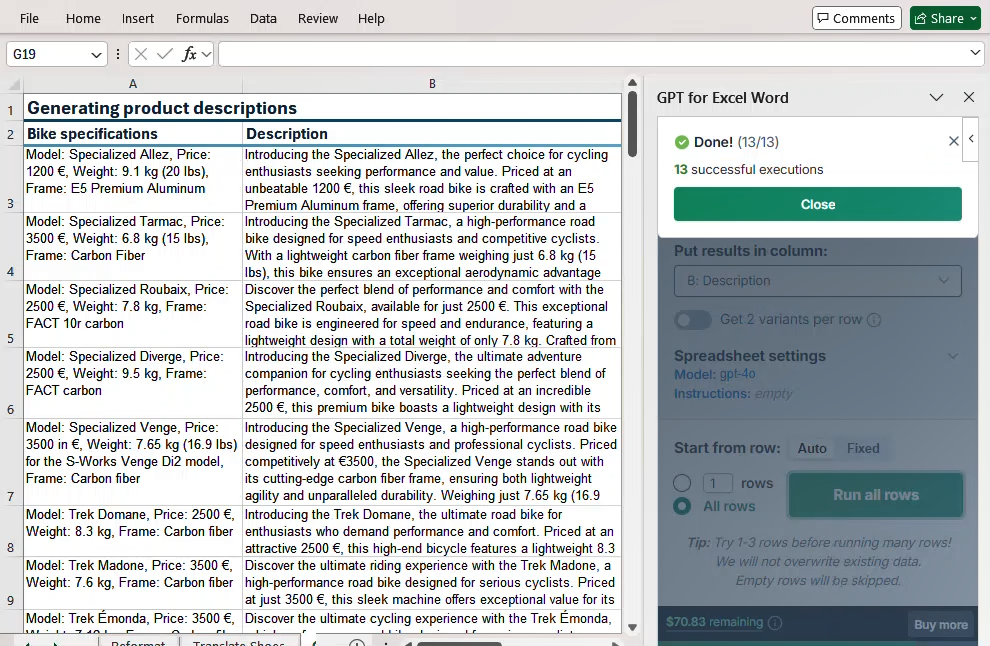
Improve results (Custom prompt)
Try different models
Find out which model works best for your use case. You can try different models by selecting them in the model switcher.
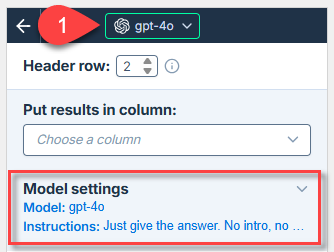
The model selection applies to all bulk tool runs and all GPT function executions in the current workbook.
Provide additional instructions
You can improve response quality by providing specific instructions that help the AI more closely follow your requirements for tone, style, format, rules, target audience, context, consistency, and other aspects.
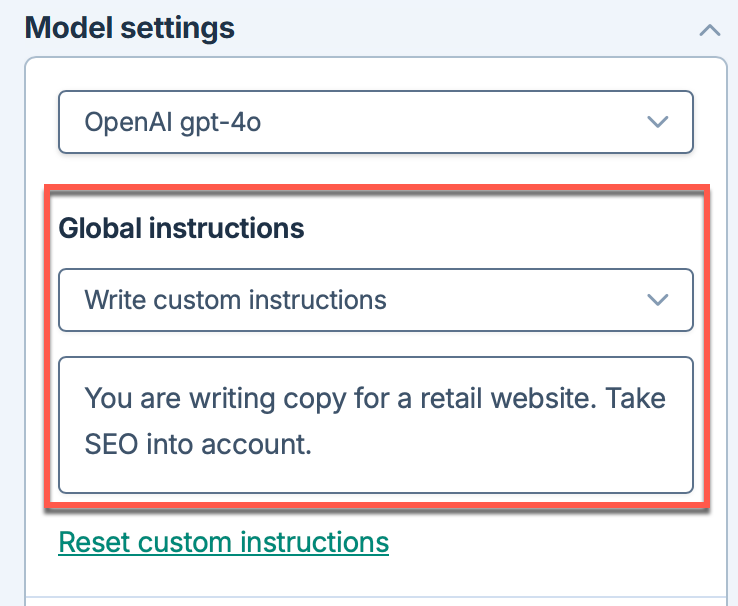
Define the instructions as Global instructions in the Model settings. The instructions apply to all bulk tools and GPT functions in the current workbook.
Global instructions apply to all bulk tool runs and all GPT function executions in the current workbook.
For example, to add instructions to follow SEO best practices:
You are writing copy for a retail website. Take SEO into account.
Adjust the creativity level
Adjust the level of creativity (accuracy vs. freedom) the AI is allowed in generating results. The higher the value, the greater the creativity.
For example:
-
If you're generating marketing content, set a high creativity level to generate more engaging and imaginative text.
-
If you're generating technical specifications, set a low creativity level to ensure the generated text is precise and factual.
-
If you need the AI to follow your instructions to the letter, set the creativity level to 0.
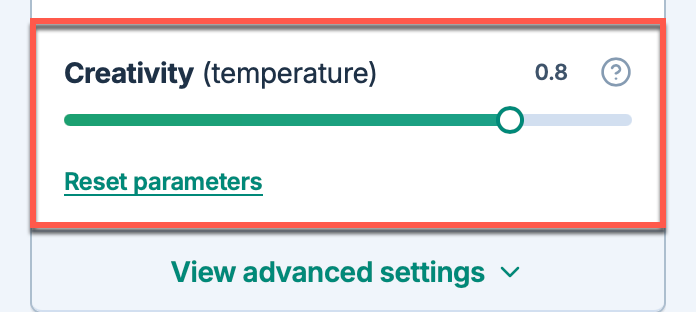
The creativity level applies to all bulk tool runs and all GPT function executions in the current workbook.
Use multiple variables in a custom prompt
You must define at least one column variable in a custom prompt for context, for example {{A}} or {{Bike specifications}}. To generate more accurate results, provide more context by using additional variables in the prompt.
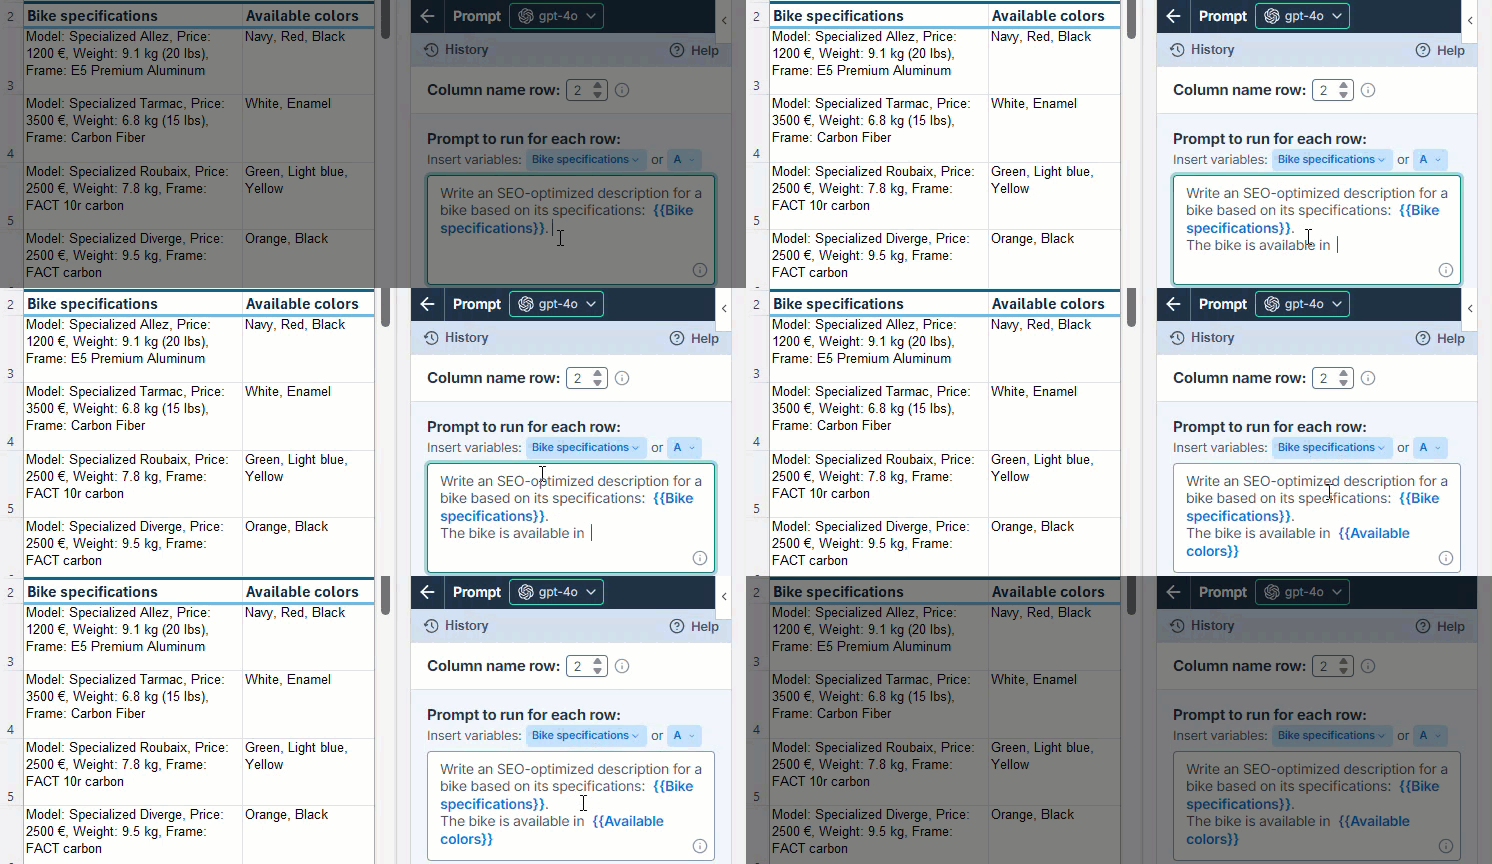
You can insert variables to reference columns, cells, and ranges in the prompt:
| Variable | Description | Example |
|---|---|---|
Column | Reference a column to include row-specific information from an adjacent column. Column variables work like relative references and are highlighted in blue. To add a column variable, use the Insert variables menus above the prompt. You can add a variable either by column label or column letter. | |
Cell or range from the current sheet | Reference a specific cell or range to include the same content as context for each row. Cell and range variables work like absolute references and are highlighted in green. To add a cell or range variable, type it directly in the prompt. | |
Cell or range from another sheet | Reference a cell or a range from another sheet in the same spreadsheet. The content can be, for example, reference data or other shared information. | |
Use web search capabilities
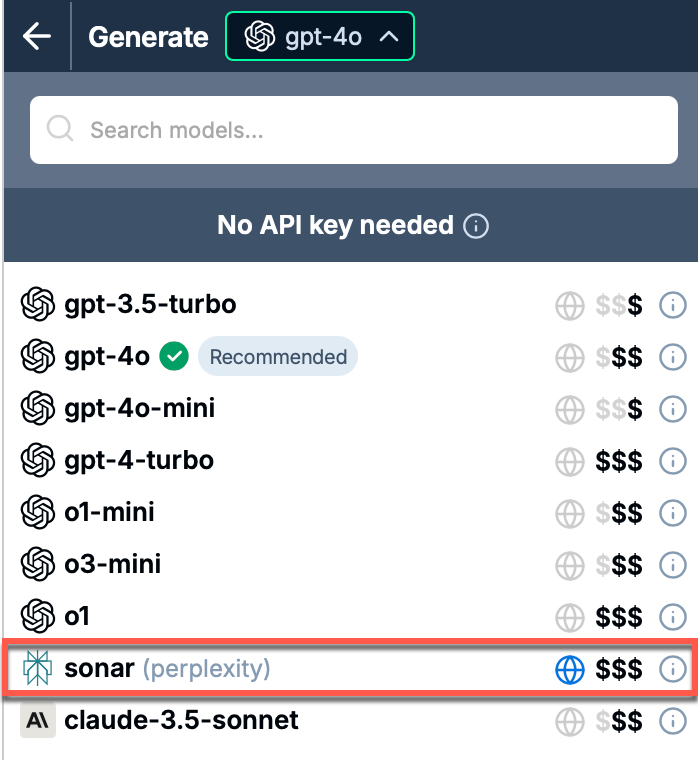
To generate more up-to-date content, select a model with web search capabilities (indicated by the 🌐 icon in the model switcher). The available web search options vary depending on the model you select. Learn more about web search options.
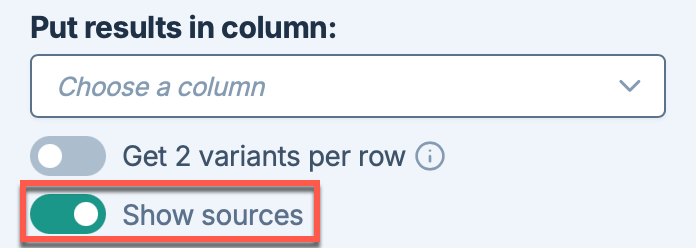
Enable Show sources to write the source references in the column to the right of the results column. This helps you understand the origin of the content and assess its reliability.
Include images in a custom prompt
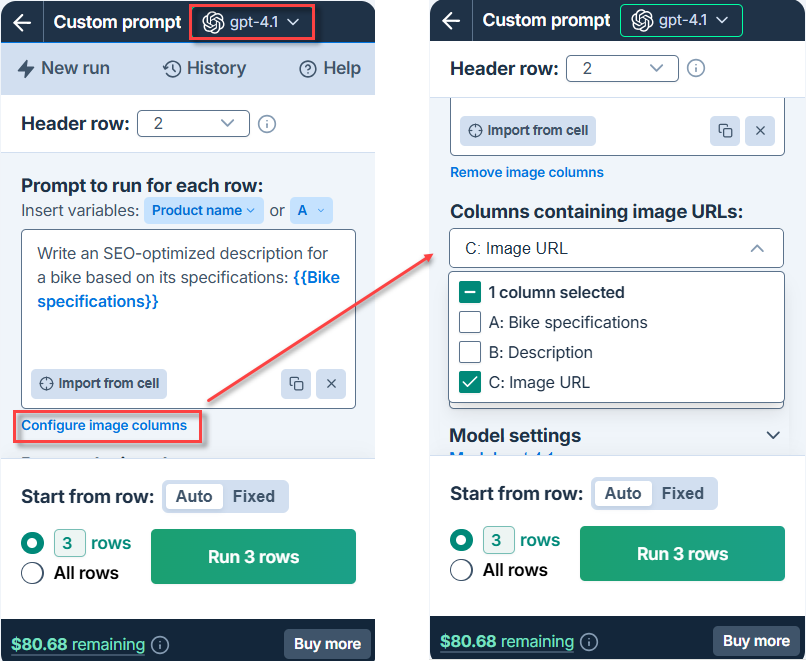
To include images in a custom prompt, select a vision model in the model switcher. Then, select the columns that contain image URLs so they can be attached to the prompt for each corresponding row. Learn more about vision options.
Translate
Use the Translate bulk tool to translate product catalogs, website copy, customer reviews, or any other content directly in Excel, and optimize your translations by adding specific instructions and a glossary to guide the AI in the process. For example, you can translate a list of product names for a shoe store into French.
Settings (Translate)
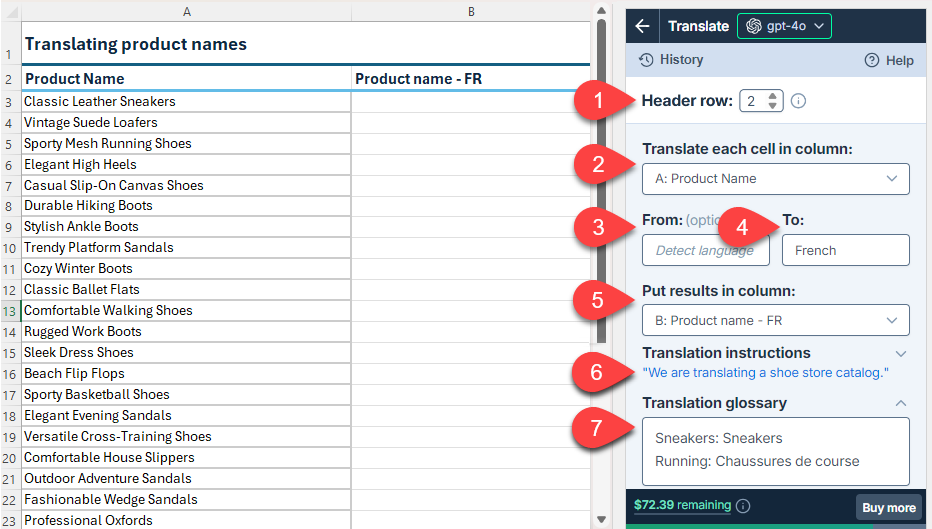
| Field | Description | Example | |
|---|---|---|---|
 | Header row (optional) | If your column headers aren't in the first row, select the number of the row that contains the headers. The bulk tool will run on the rows below this one. |
|
 | Translate each cell in column | Select the column that contains the text you want to translate. |
|
 | From (optional) | Enter the source language, or leave the field empty if you want the AI to detect the source language for each cell. | Empty |
 | To | Enter the target language. |
|
 | Put results in column | Select the column to put the results in. Cells in this column won't be overwritten with the results if they contain text. |
|
 | Translation instructions (optional) | Enter specific instructions for the translation. | |
 | Translation glossary (optional) | Enter a list of word pairs where the first word is the source language word and the second word is the target language translation of the first word. Use the following syntax for each pair:
Enter one pair per line. If your glossary is in the current document, you can import it by clicking Import from sheet. | |
Improve results (Translate)
Try different models
Find out which model works best for your use case. You can try different models by selecting them in the model switcher.

The model selection applies to all bulk tool runs and all GPT function executions in the current workbook.
Provide additional instructions
You can improve translation quality by providing specific instructions that help the AI more closely follow your requirements for tone, style, format, rules, target audience, context, consistency, and other aspects.
You can define the following types of instructions for the AI:
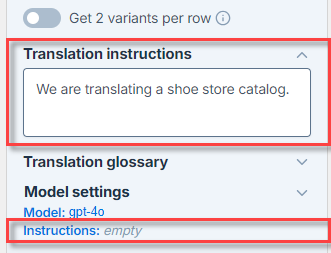
Translation instructions are defined for the current bulk tool run.
Global instructions are defined in the Model settings and apply to all bulk tools and GPT functions in the current workbook.
If both bulk tool instructions and global instructions are defined, the AI uses both as a combined set of instructions. For consistent results, make sure both sets of instructions are aligned and do not contradict each other.
Global instructions apply to all bulk tool runs and all GPT function executions in the current workbook.
For example, to omit the global instructions and only define translation instructions:
Adjust the creativity level
Adjust the level of creativity (accuracy vs. freedom) the AI is allowed in generating results. The higher the value, the greater the creativity.
For example:
-
If you're generating marketing content, set a high creativity level to generate more engaging and imaginative text.
-
If you're generating technical specifications, set a low creativity level to ensure the generated text is precise and factual.
-
If you need the AI to follow your instructions to the letter, set the creativity level to 0.

The creativity level applies to all bulk tool runs and all GPT function executions in the current workbook.
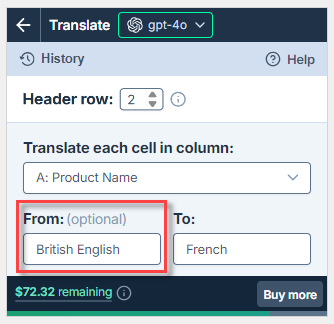
Set the source language for translations
The AI can automatically detect the source language for translations, but manually defining it helps if the source text contains short, ambiguous phrases, which can confuse the AI. For example, "Trainers" in British English means "Sports shoes", whereas in American English, it means "People who train others".
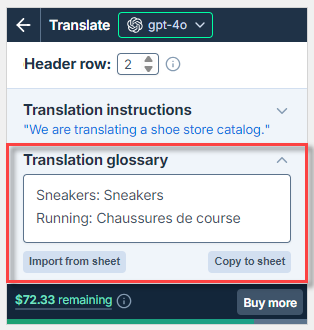
Create a glossary for translations
Glossaries ensure that translations are consistent, respect corporate terminology, and remain on-brand. If your glossary is in the current spreadsheet, you can import it by clicking Import from sheet.
Classify / Categorize
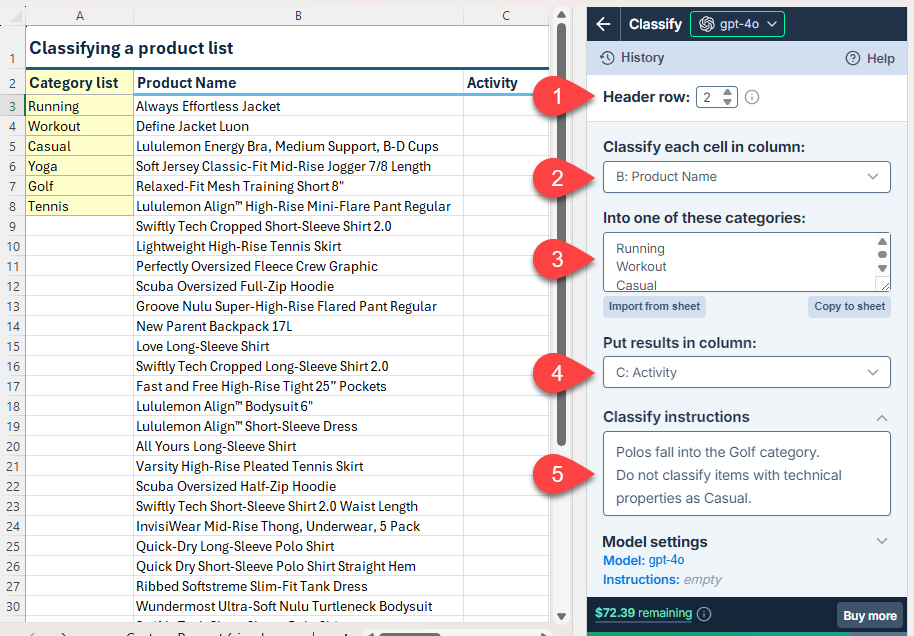
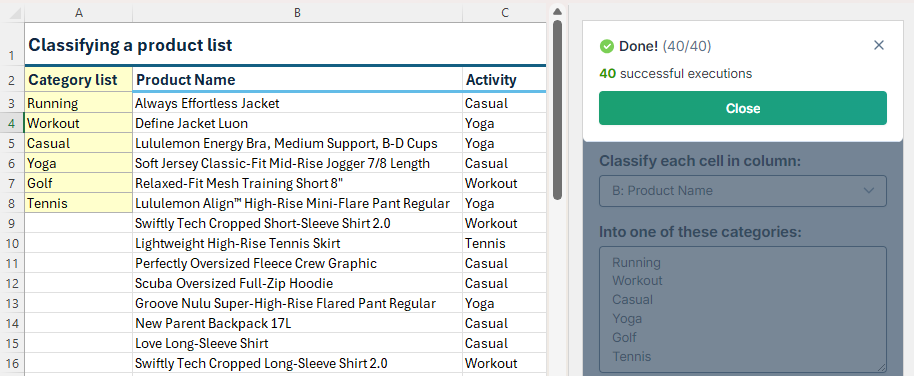
Use the Classify / Categorize bulk tool to classify your catalog items, press articles, customer reviews, social media comments, or any other text directly in Excel. The tool classifies the content of each cell into one of the categories you provide if a match is found; if not match is found, the tool fills in #N/A. For example, you can improve your lifecycle inventory management by classifying apparel products according to the activity they are used for.
Settings (Classify / Categorize)
| Field | Description | Example | |
|---|---|---|---|
 | Header row (optional) | If your column headers aren't in the first row, select the number of the row that contains the headers. The bulk tool will run on the rows below this one. |
|
 | Classify each cell in column | Select the column that contains the text you want to classify. |
|
 | Into one of these categories | Enter the categories to classify the text into. If the categories are listed in the current document, you can import them by clicking Import from sheet. | |
 | Put results in column | Select the column to put the results in. Cells in this column won't be overwritten with the results if they contain text. |
|
 | Classify instructions (optional) | Enter specific instructions for the classification. Learn more. | |
Improve results (Classify / Categorize)
Try different models
Find out which model works best for your use case. You can try different models by selecting them in the model switcher.

The model selection applies to all bulk tool runs and all GPT function executions in the current workbook.
Provide additional instructions
You can improve classification quality by providing specific instructions that help the AI more closely follow your requirements for tone, style, format, rules, target audience, context, consistency, and other aspects.
You can define the following types of instructions for the AI:
Classify instructions are defined for the current bulk tool run.
Global instructions are defined in the Model settings and apply to all bulk tools and GPT functions in the current workbook.
If both bulk tool instructions and global instructions are defined, the AI uses both as a combined set of instructions. For consistent results, make sure both sets of instructions are aligned and do not contradict each other.
Global instructions apply to all bulk tool runs and all GPT function executions in the current workbook.
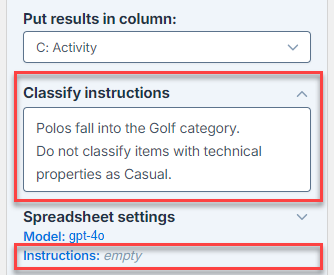
For example, to omit the global instructions and only define classify instructions:
Set Creativity to 0
Ensure Creativity is set to 0. This helps the AI follow instructions more closely.
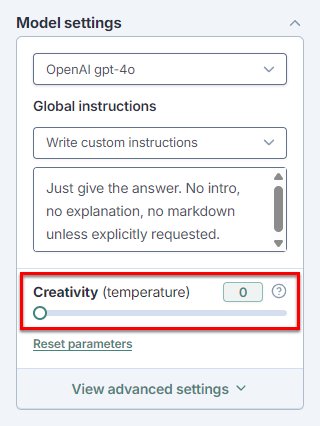
The creativity level applies to all bulk tool runs and all GPT function executions in the current workbook.
Use full path for categories
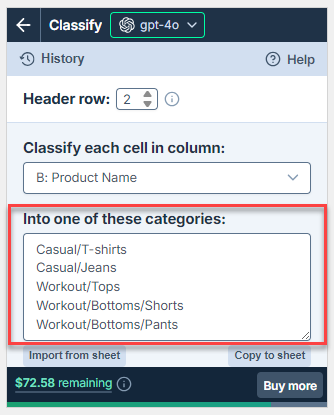
If your categories form a hierarchy, use the full path of each category instead of just its name. This helps avoid ambiguity and ensures that the classification is as precise as possible.
Using only category names can lead to ambiguity. For example, T-shirts and Tops could be considered as very largely overlapping categories. By specifying Casual/T-shirts and Workout/Tops, you provide a clear context, ensuring that the AI classifies the items accurately according to the intended category.
For example, instruct the AI to classify items according to these category paths:
Casual/T-shirts
Casual/Jeans
Workout/Tops
Workout/Bottoms/Shorts
Workout/Bottoms/Pants
Extract
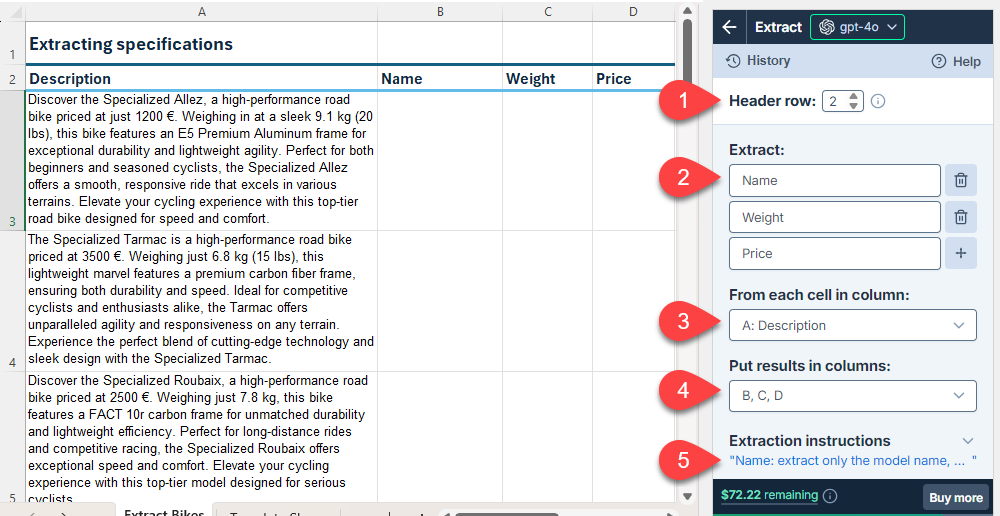
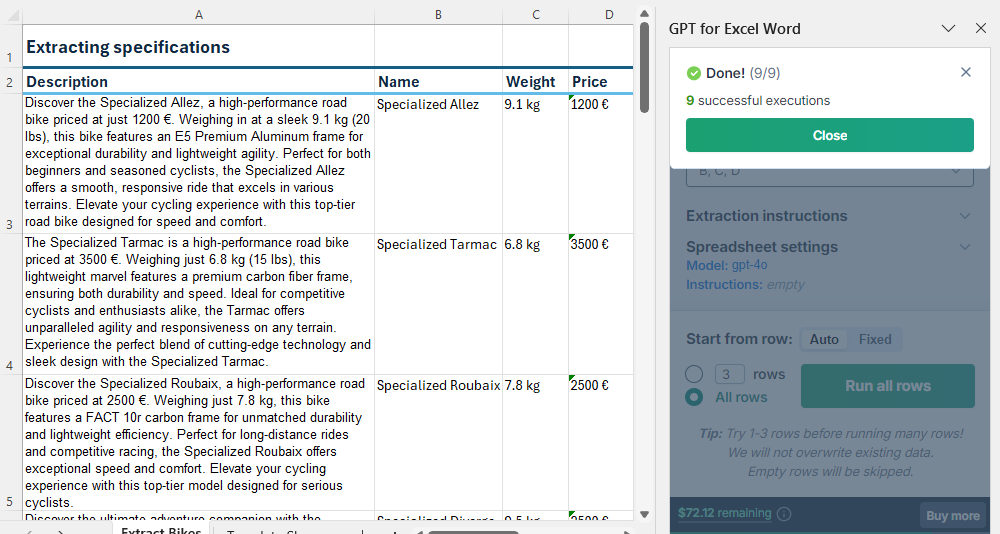
Use the Extract bulk tool to extract key information like names, email addresses, and product attributes from unstructured text directly in Excel. For example, you can extract name, weight, and price from bike model descriptions to create a catalog.
Settings (Extract)
| Field | Description | Example | |
|---|---|---|---|
 | Header row (optional) | If your column headers aren't in the first row, select the number of the row that contains the headers. The bulk tool will run on the rows below this one. |
|
 | Extract | Enter the entities you want to extract. | |
 | From each cell in column | Select the column that contains the text from which you want to extract entities. |
|
 | Put results in column | Select the column or columns to put the results in. Cells in these columns won't be overwritten with the results if they contain text. |
|
 | Extraction instructions (optional) | Enter specific instructions for the extraction. | |
Improve results (Extract)
Try different models
Find out which model works best for your use case. You can try different models by selecting them in the model switcher.

The model selection applies to all bulk tool runs and all GPT function executions in the current workbook.
Provide additional instructions
You can improve extraction quality by providing specific instructions that help the AI more closely follow your requirements for tone, style, format, rules, target audience, context, consistency, and other aspects.
You can define the following types of instructions for the AI:
Extraction instructions are defined for the current bulk tool run.
Global instructions are defined in the Model settings and apply to all bulk tools and GPT functions in the current workbook.
If both bulk tool instructions and global instructions are defined, the AI uses both as a combined set of instructions. For consistent results, make sure both sets of instructions are aligned and do not contradict each other.
Global instructions apply to all bulk tool runs and all GPT function executions in the current workbook.
For example, to omit the global instructions and only define extraction instructions:
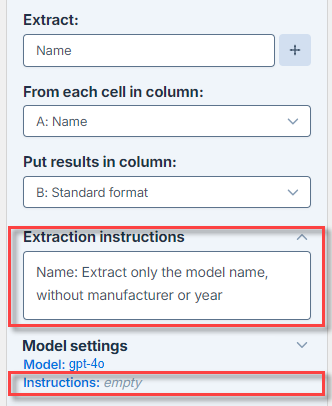
The following table provides examples of extraction instructions for different goals:
| Goal | Description | Example |
|---|---|---|
Remove irrelevant information | Define what should be excluded from the extraction to get cleaner results. | |
Normalize entities | Set a consistent output for variations of the same entity in your text. | |
Extract numerical values and units | Separate numbers from units to simplify their manipulation. | Add |
Perform open-ended extraction
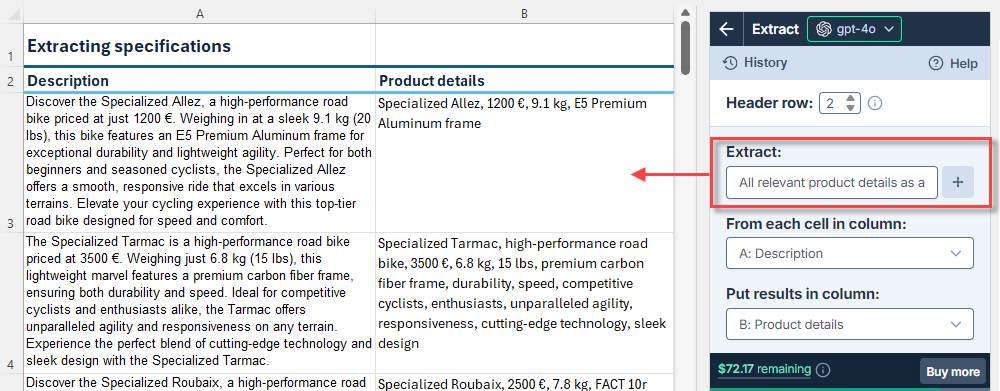
Open-ended extraction helps you gather a wide range of information without specifying each entity. This approach works well when entities vary from one cell to another or when you want to avoid missing any extraction.
For example, enter the following in the Extract field:
All relevant product details as a comma-separated list.
Prompt images (Vision)
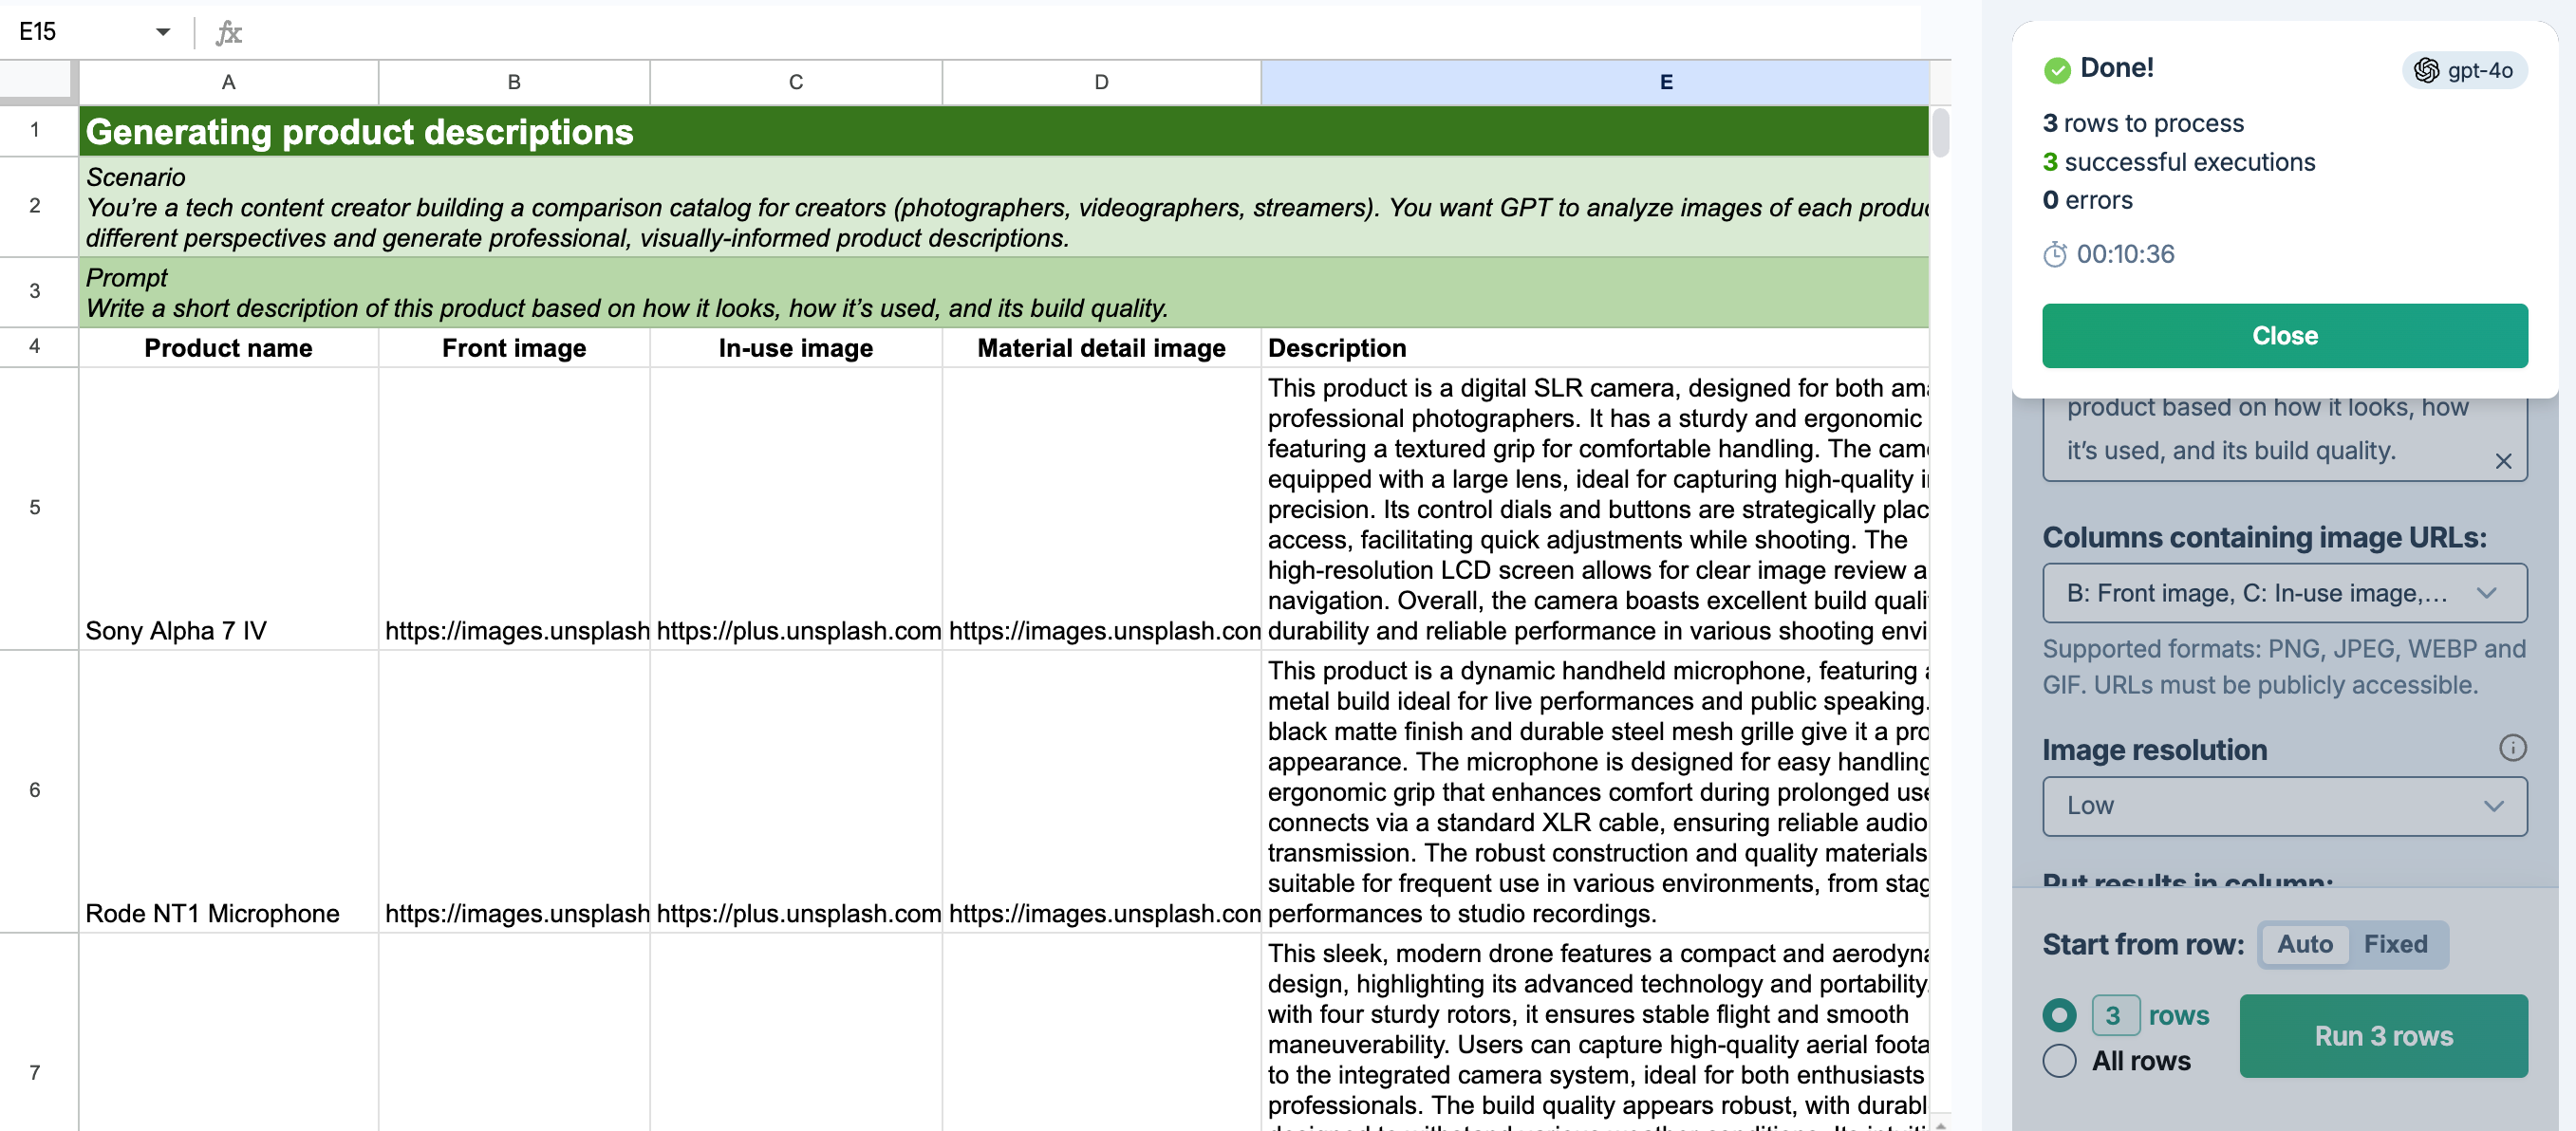
Use the Prompt images (Vision) bulk tool to generate content based on images directly in Excel. For example, you can generate descriptions for your product images to improve your listings.
-
Custom prompt and Prompt images (Vision) are the only bulk tools that accept images as input.
-
To use Prompt images (Vision), you must select a vision model.
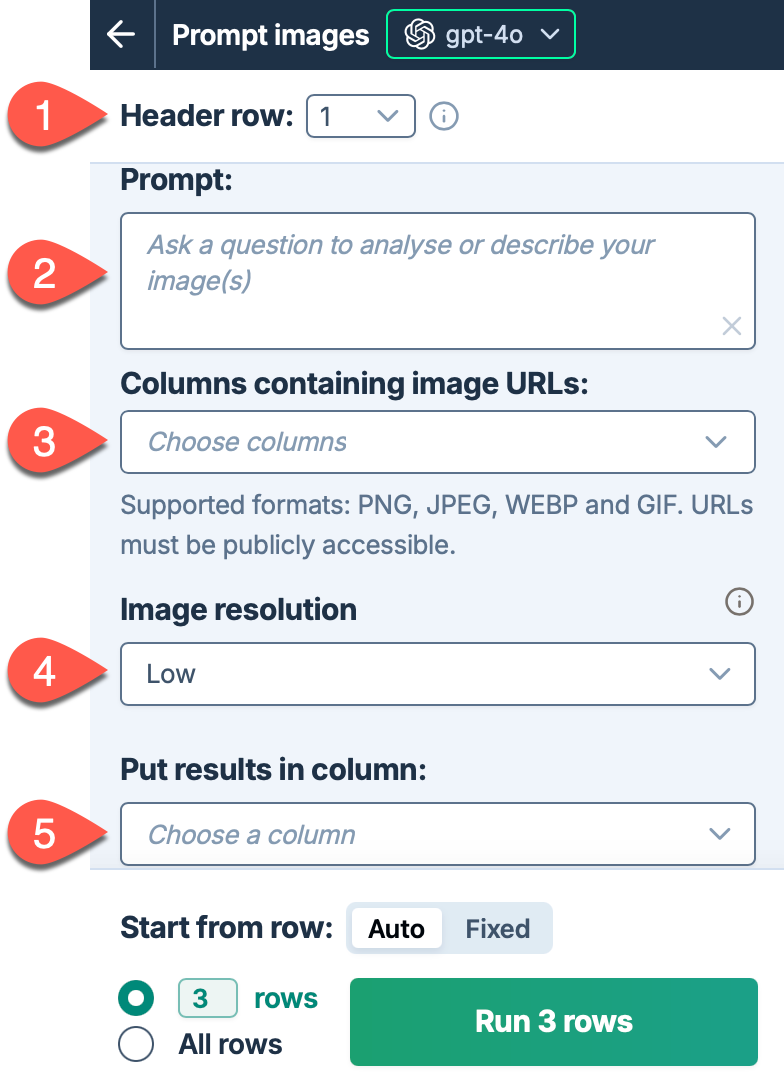
Settings (Vision)
| Field | Description | Example | |
|---|---|---|---|
 | Header row (optional) | If your column headers aren't in the first row, select the number of the row that contains the headers. The bulk tool will run on the rows below this one. |
|
 | Prompt | Describe the task you want the AI to perform based on the target images. For example, ask a question about the images or request content based on the images. | |
 | Columns containing image URLs | Select up to five columns that contain image URLs. For each row, the tool processes all images present in the selected columns. URLs must be publicly accessible. Supported image formats:
|
|
 | Image resolution (optional) | Choose the level of detail for image processing:
|
|
 | Put results in column (optional) | Select the column to put the results in. Cells in this column won't be overwritten with the results if they contain text. |
|
Improve results (Vision)
Use the recommended vision model
In the model switcher, select gpt-5.2 as the vision model. For more information about image-related tasks, see Use images in prompts.

The model selection applies to all bulk tool runs and all GPT function executions in the current workbook.
Adjust the creativity level
Adjust the level of creativity (accuracy vs. freedom) the AI is allowed in generating results. The higher the value, the greater the creativity.
For example:
-
If you're generating marketing content, set a high creativity level to generate more engaging and imaginative text.
-
If you're generating technical specifications, set a low creativity level to ensure the generated text is precise and factual.
-
If you need the AI to follow your instructions to the letter, set the creativity level to 0.

The creativity level applies to all bulk tool runs and all GPT function executions in the current workbook.
Adjust image resolution
Choose the appropriate image resolution setting based on your needs:
-
High: Use for detailed analysis where image quality and understanding are critical. This setting provides better image understanding but increases latency and cost.
-
Low: Use for faster processing and lower cost when basic image recognition is sufficient.
-
Auto: Let the model decide the optimal resolution (default).
For product descriptions and detailed analysis, consider using High resolution to ensure the AI captures all important visual details.
Generate
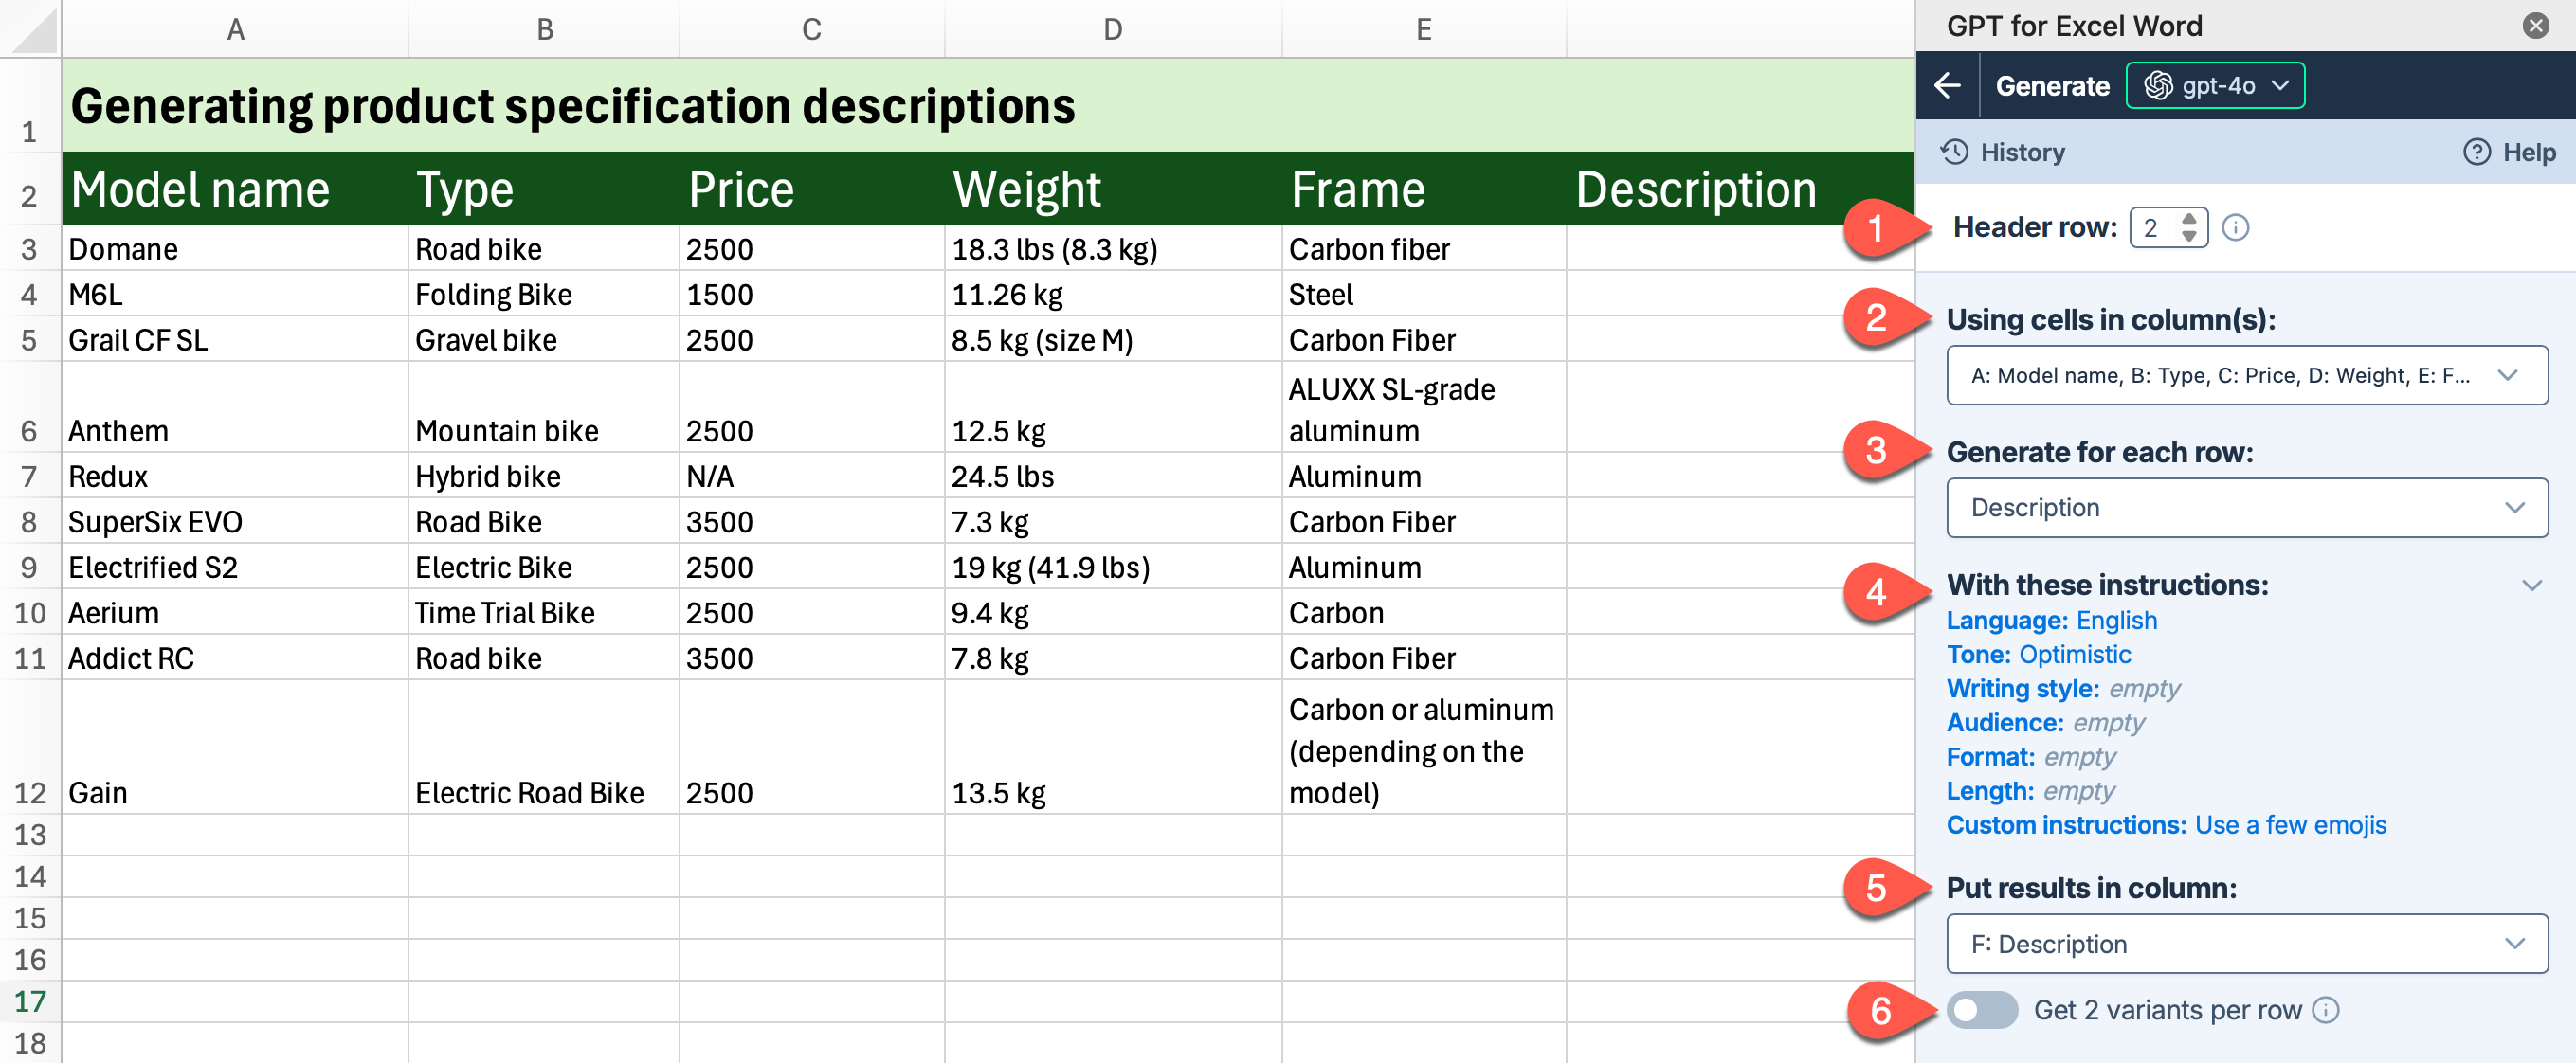
Use the Generate bulk tool to generate content by combining cells from multiple columns in Excel. For example, you can generate product descriptions based on specifications from different columns.
Settings (Generate)
| Field | Description | Example | |
|---|---|---|---|
 | Header row (optional) | If your column headers aren't in the first row, select the number of the row that contains the headers. The bulk tool will run on the rows below this one. |
|
 | Using cells in column(s) | Select one or more columns containing the cells you want to use as context for the generation. |
|
 | Generate for each row | Select the type of content you want to generate, such as a title or description. You can also enter a custom content type to generate, such as |
|
 | With these instructions | Customize the output by setting the language, tone, writing style, audience, format, length, and custom instructions specific to this generation task. |
|
 | Put results in column | Select the column to put the results in. Cells in this column won't be overwritten with the results if they contain text. |
|
 | Get 2 variants per row (optional) | Enable this option to generate two variants for each row. The variants are placed in adjacent columns. | Disabled |
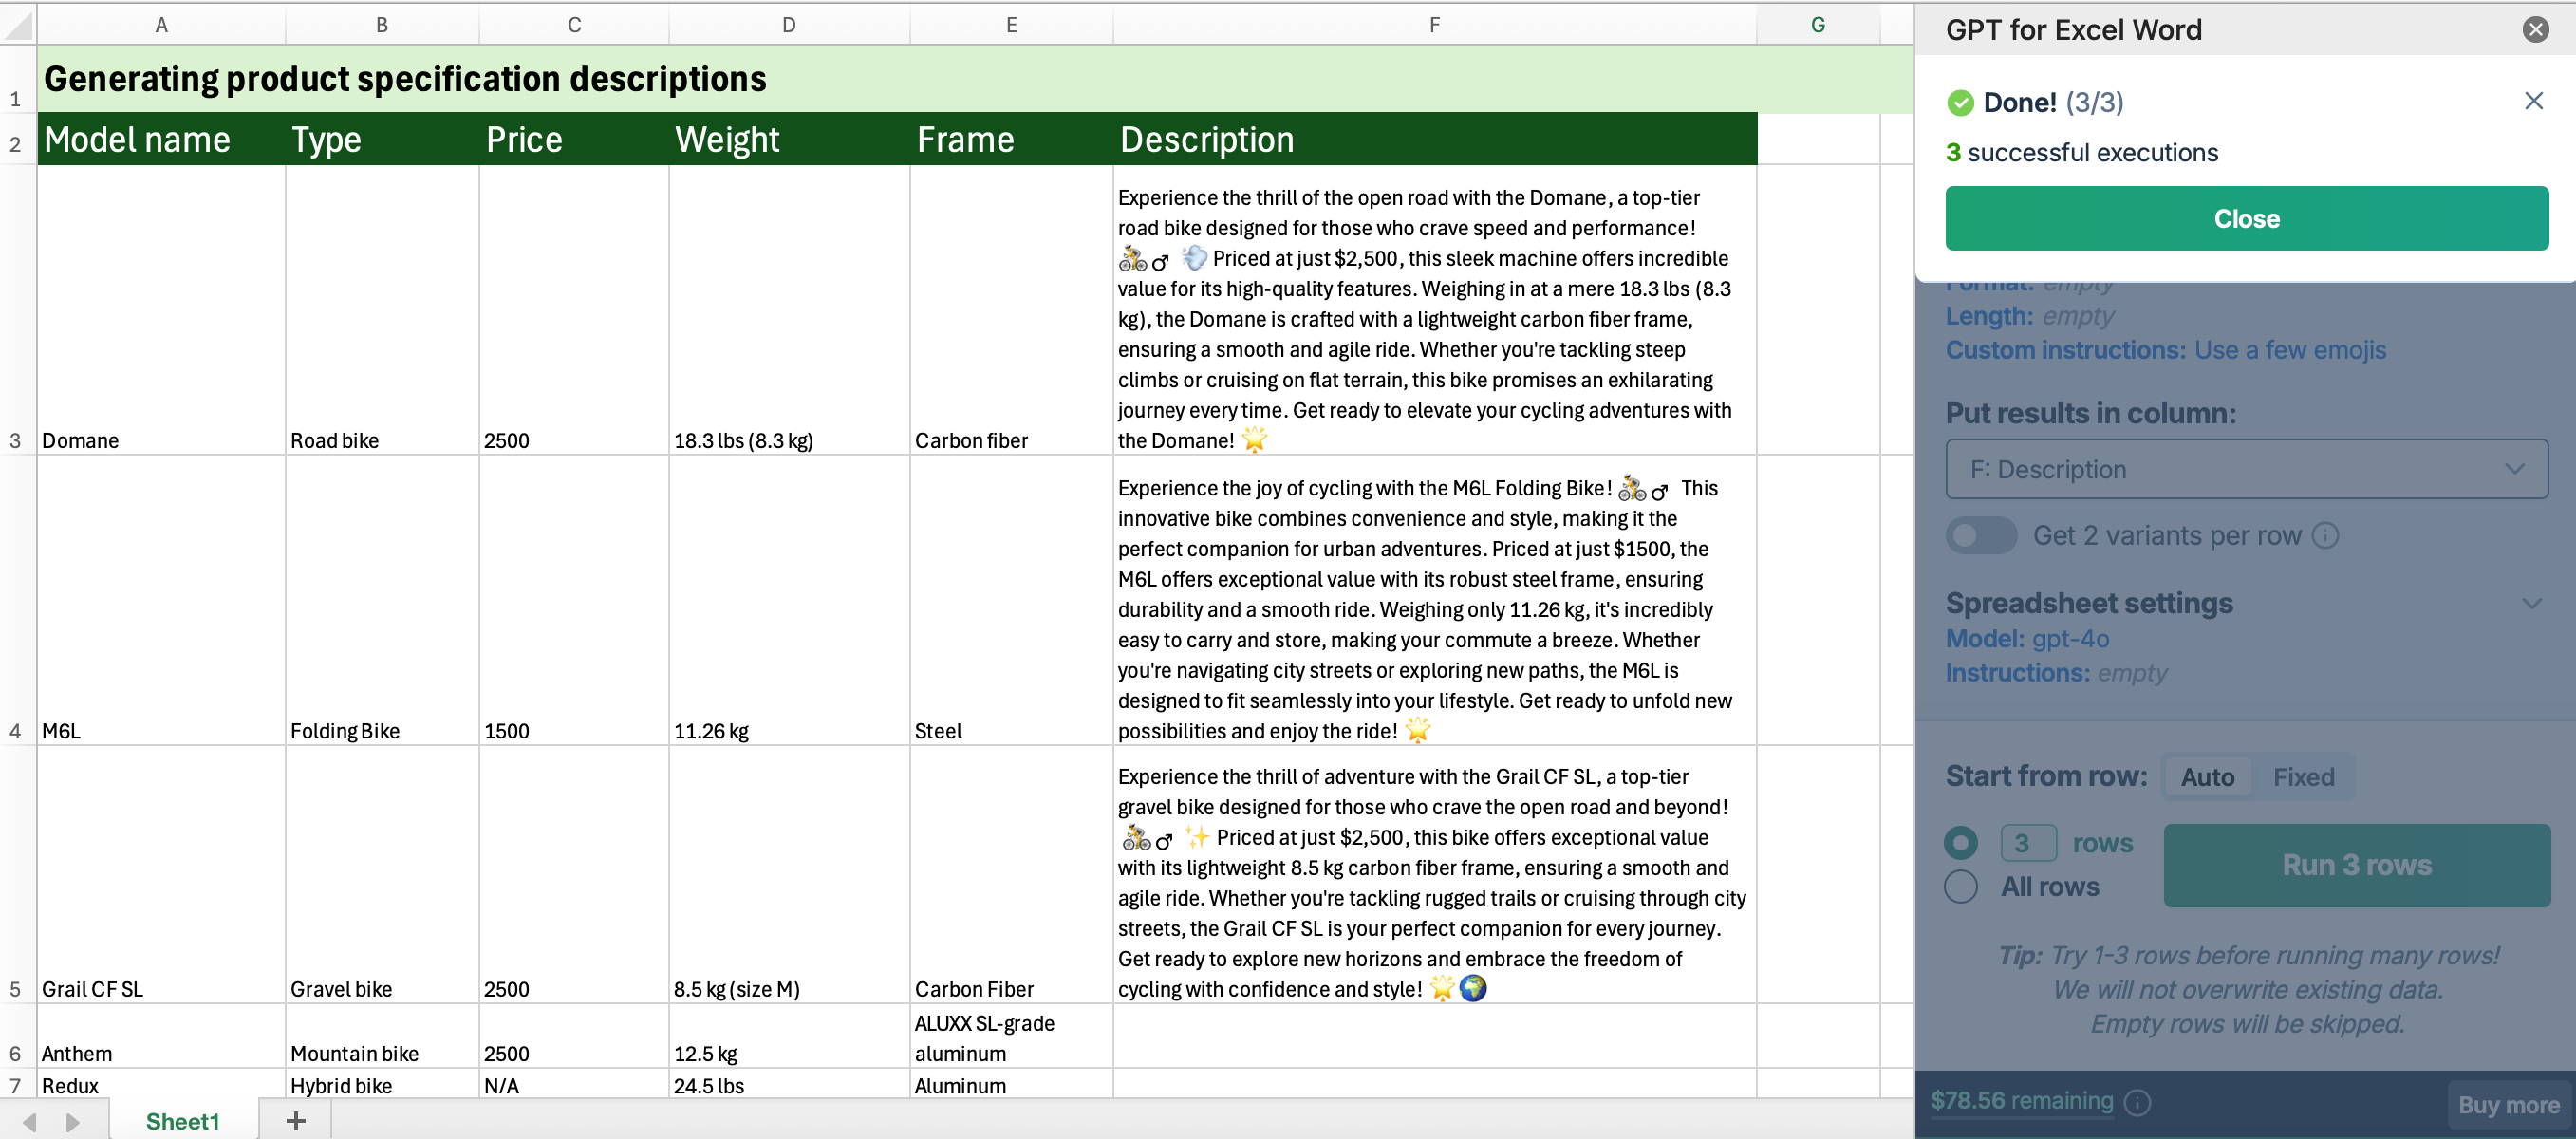
Improve results (Generate)
Try different models
Find out which model works best for your use case. You can try different models by selecting them in the model switcher.

The model selection applies to all bulk tool runs and all GPT function executions in the current workbook.
Provide additional instructions
You can improve generation quality by providing specific instructions that help the AI more closely follow your requirements for tone, style, format, rules, target audience, context, consistency, and other aspects.
You can define the following types of instructions for the AI:
Generation instructions are defined for the current bulk tool run.
Global instructions are defined in the Model settings and apply to all bulk tools and GPT functions in the current workbook.
If both bulk tool instructions and global instructions are defined, the AI uses both as a combined set of instructions. For consistent results, make sure both sets of instructions are aligned and do not contradict each other.
Global instructions apply to all bulk tool runs and all GPT function executions in the current workbook.
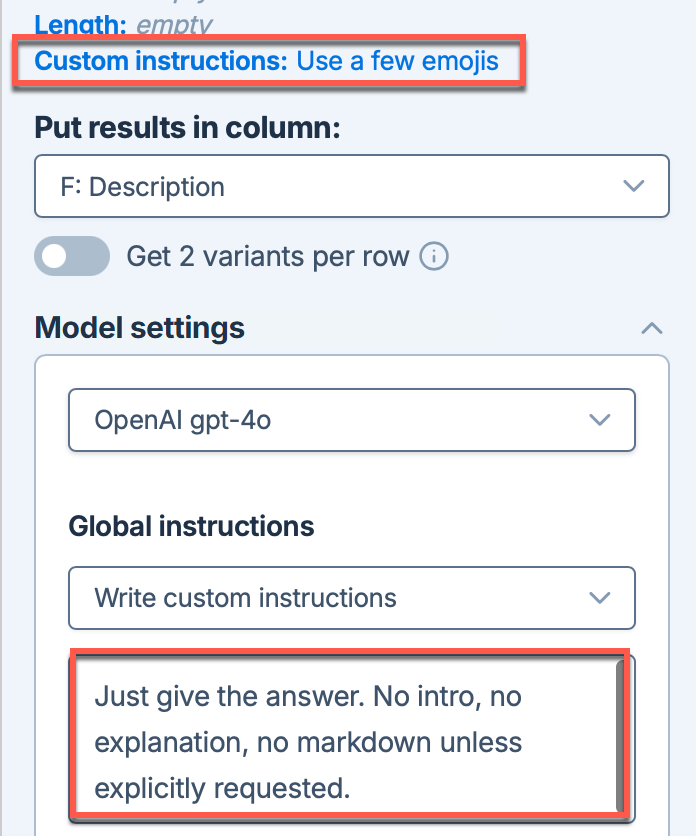
For example, to set the current run to use a few emojis and instruct the AI to be concise in all runs:
Adjust the creativity level
Adjust the level of creativity (accuracy vs. freedom) the AI is allowed in generating results. The higher the value, the greater the creativity.
For example:
-
If you're generating marketing content, set a high creativity level to generate more engaging and imaginative text.
-
If you're generating technical specifications, set a low creativity level to ensure the generated text is precise and factual.
-
If you need the AI to follow your instructions to the letter, set the creativity level to 0.

The creativity level applies to all bulk tool runs and all GPT function executions in the current workbook.
Use web search capabilities
To generate more up-to-date content, select a model with web search capabilities (indicated by the 🌐 icon in the model switcher). The available web search options vary depending on the model you select. Learn more about web search options.

Enable Show sources to write the source references in the column to the right of the results column. This helps you understand the origin of the content and assess its reliability.

Rewrite
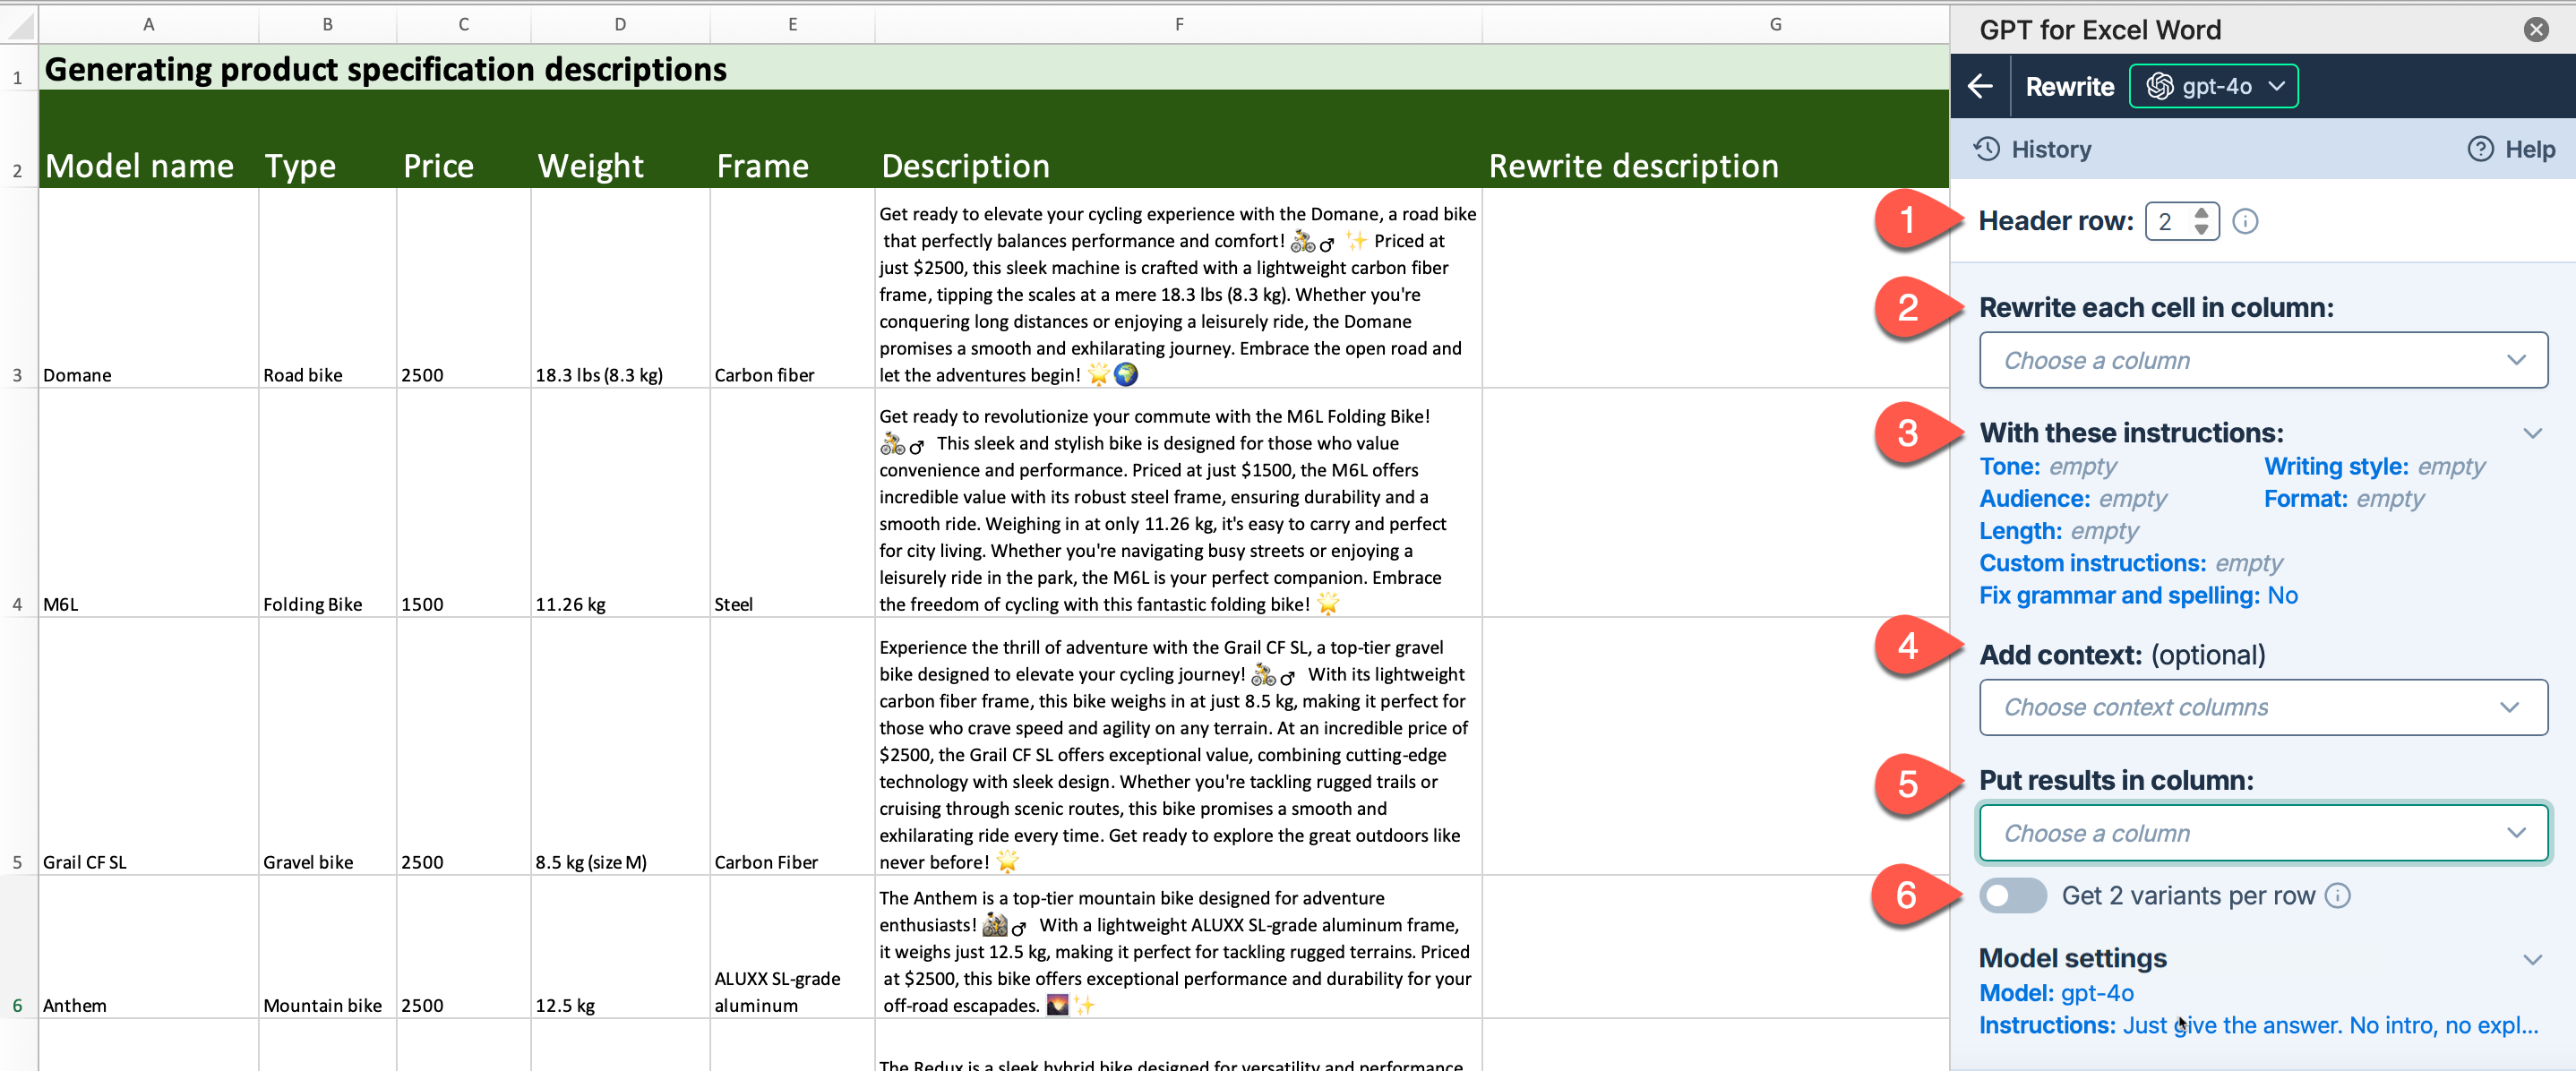
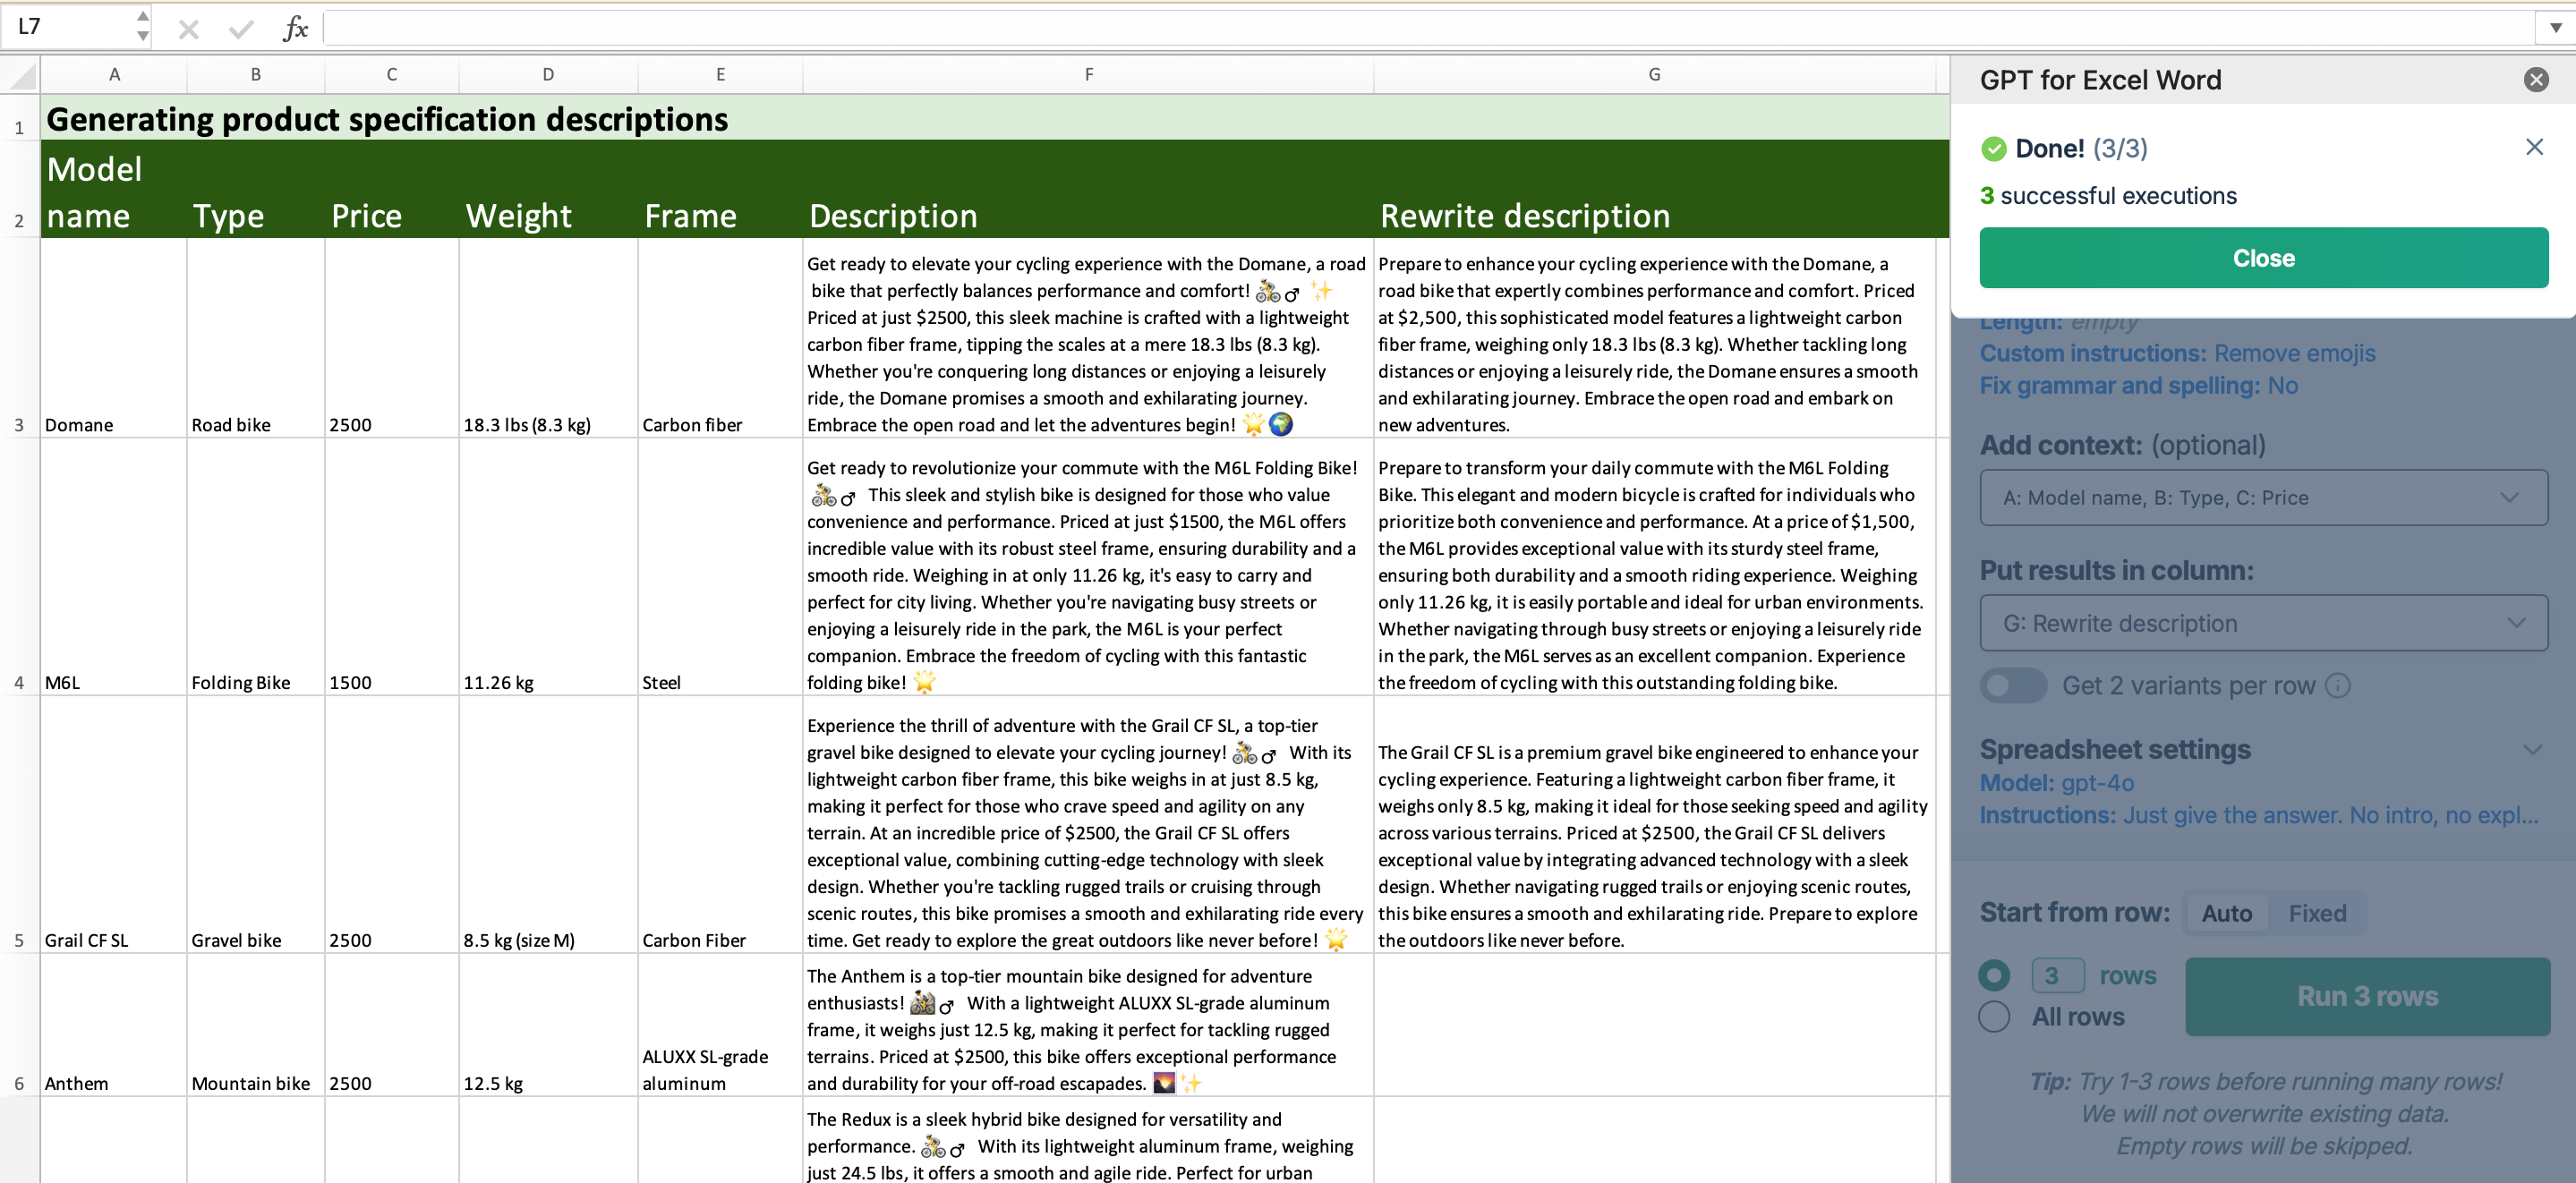
Use the Rewrite bulk tool to rewrite existing content in Excel to match your desired tone and style. For example, you can transform casual product descriptions into professional ones.
Settings (Rewrite)
| Field | Description | Example | |
|---|---|---|---|
 | Header row (optional) | If your column headers aren't in the first row, select the number of the row that contains the headers. The bulk tool will run on the rows below this one. |
|
 | Rewrite each cell in column | Select the column that contains the text you want to rewrite. |
|
 | With these instructions | Customize how the text should be rewritten by setting the tone, writing style, audience, format, length, and custom instructions, and whether to fix grammar and spelling errors. |
|
 | Add context (optional) | Select additional columns to provide context for the rewrite. |
|
 | Put results in column | Select the column to put the rewritten text in. Cells in this column won't be overwritten if they contain text. |
|
 | Get 2 variants per row (optional) | Enable this option to generate two rewrite variants for each row. The variants are placed in adjacent columns. | Disabled |
Improve results (Rewrite)
Try different models
Find out which model works best for your use case. You can try different models by selecting them in the model switcher.

The model selection applies to all bulk tool runs and all GPT function executions in the current workbook.
Provide additional instructions
You can improve reformatting quality by providing specific instructions that help the AI more closely follow your requirements for tone, style, format, rules, target audience, context, consistency, and other aspects.
Define the instructions as Global instructions in the Model settings. The instructions apply to all bulk tools and GPT functions in the current workbook.
Global instructions apply to all bulk tool runs and all GPT function executions in the current workbook.
For example, to add instructions to follow SEO best practices:
You are writing copy for a retail website. Take SEO into account.

Adjust the creativity level
Adjust the level of creativity (accuracy vs. freedom) the AI is allowed in generating results. The higher the value, the greater the creativity.
For example:
-
If you're generating marketing content, set a high creativity level to generate more engaging and imaginative text.
-
If you're generating technical specifications, set a low creativity level to ensure the generated text is precise and factual.
-
If you need the AI to follow your instructions to the letter, set the creativity level to 0.

The creativity level applies to all bulk tool runs and all GPT function executions in the current workbook.
Reformat
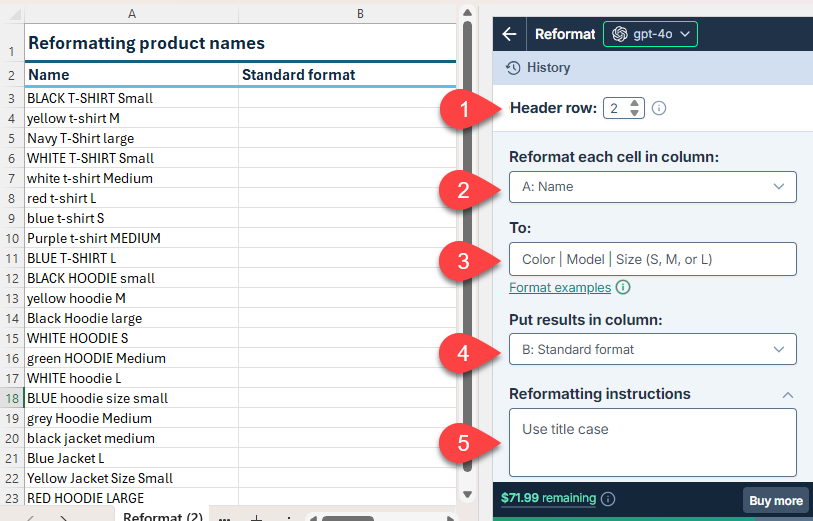
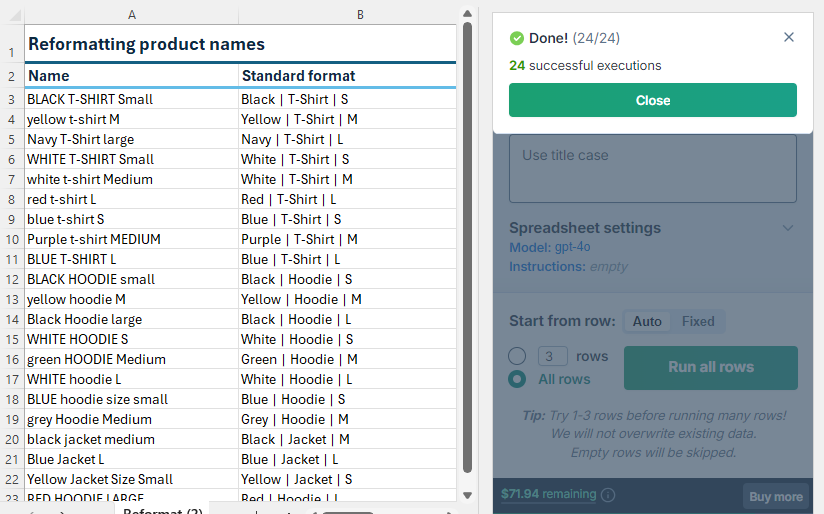
Use the Reformat bulk tool to standardize dates, phone numbers, or any other text to a consistent format directly in Excel. For example, you can reformat product names before you include them in your catalog.
Settings (Reformat)
| Field | Description | Example | |
|---|---|---|---|
 | Header row (optional) | If your column headers aren't in the first row, select the number of the row that contains the headers. The bulk tool will run on the rows below this one. |
|
 | Reformat each cell in column | Select the column that contains the text to reformat. |
|
 | To | Describe the format to which you want to convert the text. | |
 | Put results in column | Select the column to put the results in. Cells in this column won't be overwritten with the results if they contain text. |
|
 | Reformatting instructions (optional) | Enter specific instructions for the reformatting. | |
Improve results (Reformat)
Try different models
Find out which model works best for your use case. You can try different models by selecting them in the model switcher.

The model selection applies to all bulk tool runs and all GPT function executions in the current workbook.
Provide additional instructions
You can improve response quality by providing specific instructions that help the AI more closely follow your requirements for tone, style, format, rules, target audience, context, consistency, and other aspects.
You can define the following types of instructions for the AI:
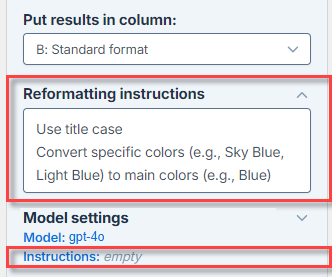
Reformatting instructions are defined for the current bulk tool run.
Global instructions are defined in the Model settings and apply to all bulk tools and GPT functions in the current workbook.
If both bulk tool instructions and global instructions are defined, the AI uses both as a combined set of instructions. For consistent results, make sure both sets of instructions are aligned and do not contradict each other.
Global instructions apply to all bulk tool runs and all GPT function executions in the current workbook.
For example, to omit the global instructions and only define reformatting instructions:
Set Creativity to 0
Ensure Creativity is set to 0. This helps the AI follow instructions more closely.

The creativity level applies to all bulk tool runs and all GPT function executions in the current workbook.